
Scenario
You are using the Calendly element, Microsoft Bookings element, or Chili Piper element in your signature, and you want this to change the calendar link used based on the sender. For example, the signature is used for all the members of a department, but each member needs to send their individual Calendly or Microsoft Bookings calendar.
Resolution
Calendar elements use URLs to connect calendars to your signature. You can create user-specific calendar URLs by creating dynamic hyperlinks, which replace part of the URL with user-specific information. The static part of the link stays the same, and the dynamic part of the link makes it unique to the user.
For example, a Microsoft Bookings link may read:
https://outlook.office.com/bookwithme/user/[bookings ID]@[domain].com/?anonymous&ep=plink
The static part of the URL would be
https://outlook.office.com/bookwithme/user/
and the dynamic part of the link would be
[bookings ID]@[domain].com/?anonymous&ep=plink
To create a dynamic hyperlink for calendars, store the dynamic data in one of the following ways:
- In a custom attribute
- In the User Details Editor
- In Exclaimer via a CSV upload - either by manually downloading a CSV of user data and reuploading it, or by using a Powershell script to generate a CSV (Global Administrator permissions are required).
Then, add your calendar element to your signature and populate your hyperlink with the static part of the URL, then the dynamic part via fields. The fields draw the dynamic data from where it is stored.
To create and use a dynamic calendar hyperlink
Select an option below to view the related instructions:
- In your chosen directory, select or create a custom attribute field for your data. Ensure that you use the same attribute field for every user.
- Enter your user-specific section of the URL (in the format [bookingID@[domain].com) and save the attribute.
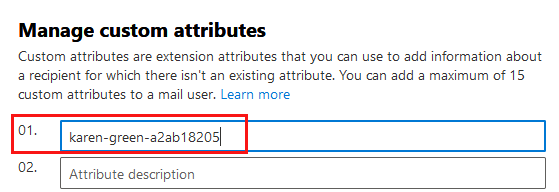
The user-specific section of the URL is stored in the custom field when creating a part-dynamic hyperlink.
-
Perform a manual data synchronization to synchronize these details.
- Open your signature in the Signature Designer.
- Add the required calendar element to the signature. For more information, see Working with the Calendly element, Working with the Microsoft Bookings element, or Working with the Chili Piper element.
- In the Booking page URL text box, add the static part of the URL.
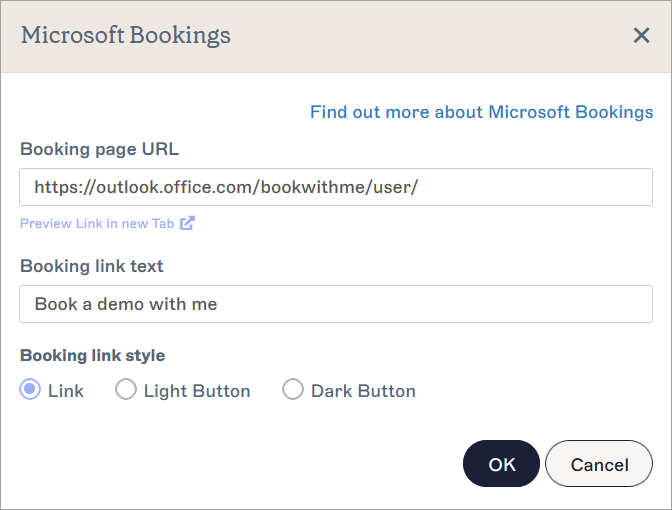
A Microsoft Bookings window. The static half of the example URL ends at 'user/'. The dynamic half is added after the '/'.
- At the end of the static part of the link, enter { and begin typing the name of the custom attribute field which stores the dynamic data. Select the correct field from the autofill drop-down.
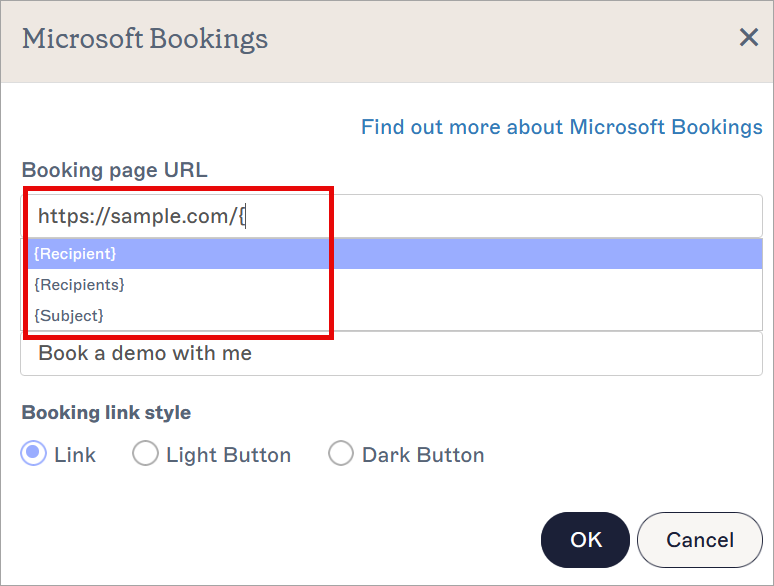
Select your new field from the autofill list.
-
Select OK to close the element window and select Save Changes to save your signature template. Your Booking page URL now directs recipients to the unique link.
Tip! You can use Visibility properties on the calendar elements so that the element only becomes visible if the field containing the dynamic part of the booking link is populated. For more information, see how to use Conditional Visibility.
The Starter plan does not have access to the user-editable contact details.
The Standard plan has access to two editable contact fields.
The Pro plan and any Marketing Cloud subscriptions purchased before April 2023 have acces to an unlimited number of editable fields. For more information on pricing plans, see Exclaimer Pricing Plans.
User Details Editor (UDE) fields cannot be renamed, but you can create a custom attribute to control field names.
- Sign in to the User Details Editor as a Microsoft 365 Global Administrator or Google Super Admin.
- Select Settings.
- Enable an attribute to store the dynamic data in. For more information, see Manage settings for user editable contact details.
The Settings page. Select a checkbox to enable an attribute.
- Select Save Changes.
-
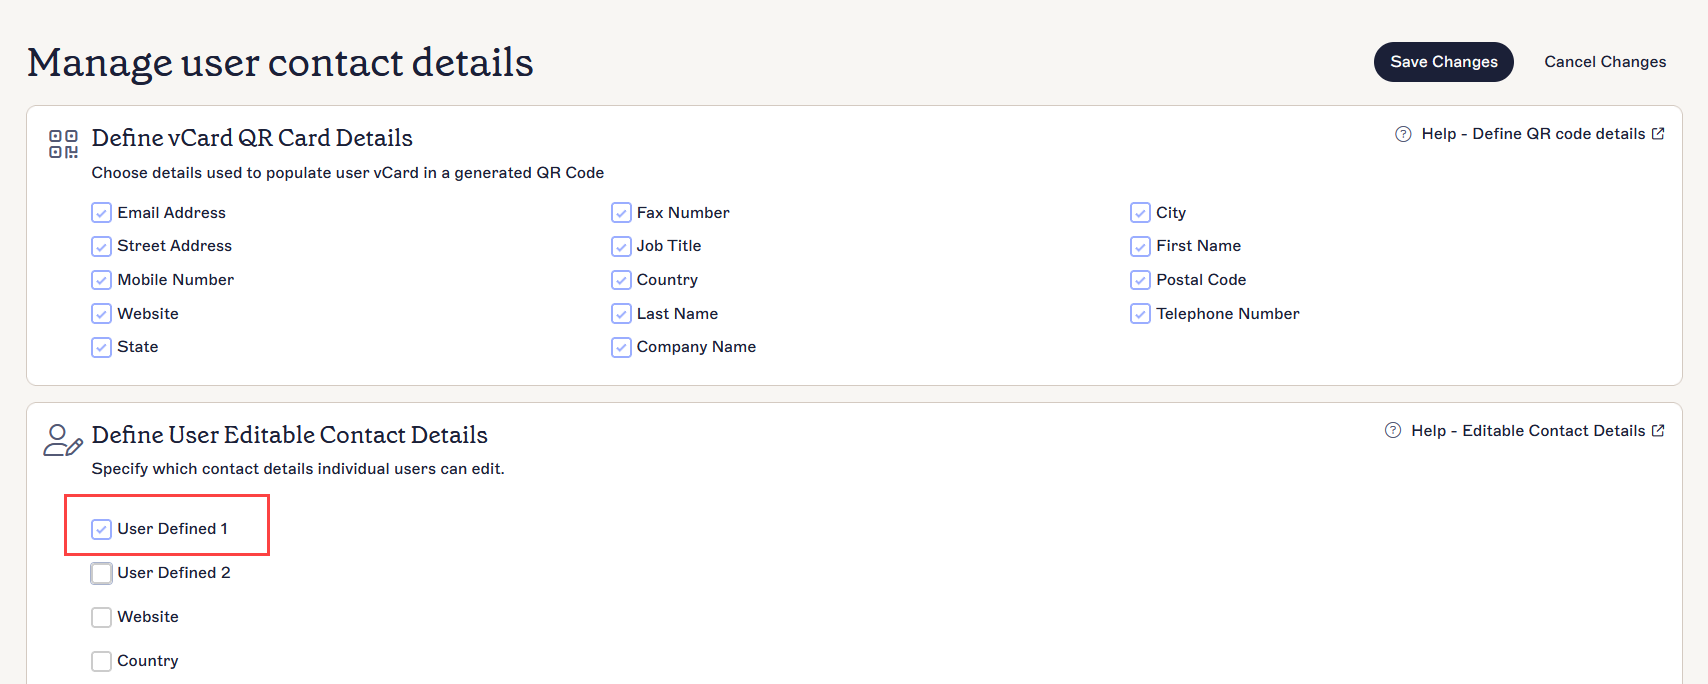
Return to the User Details Editor by selecting Contact Details and enter the dynamic section of the booking link in the designated attribute field.
Tip! End-users can enter their own data in the UDE. For more information on how you can enter your own data, see Manage your contact details.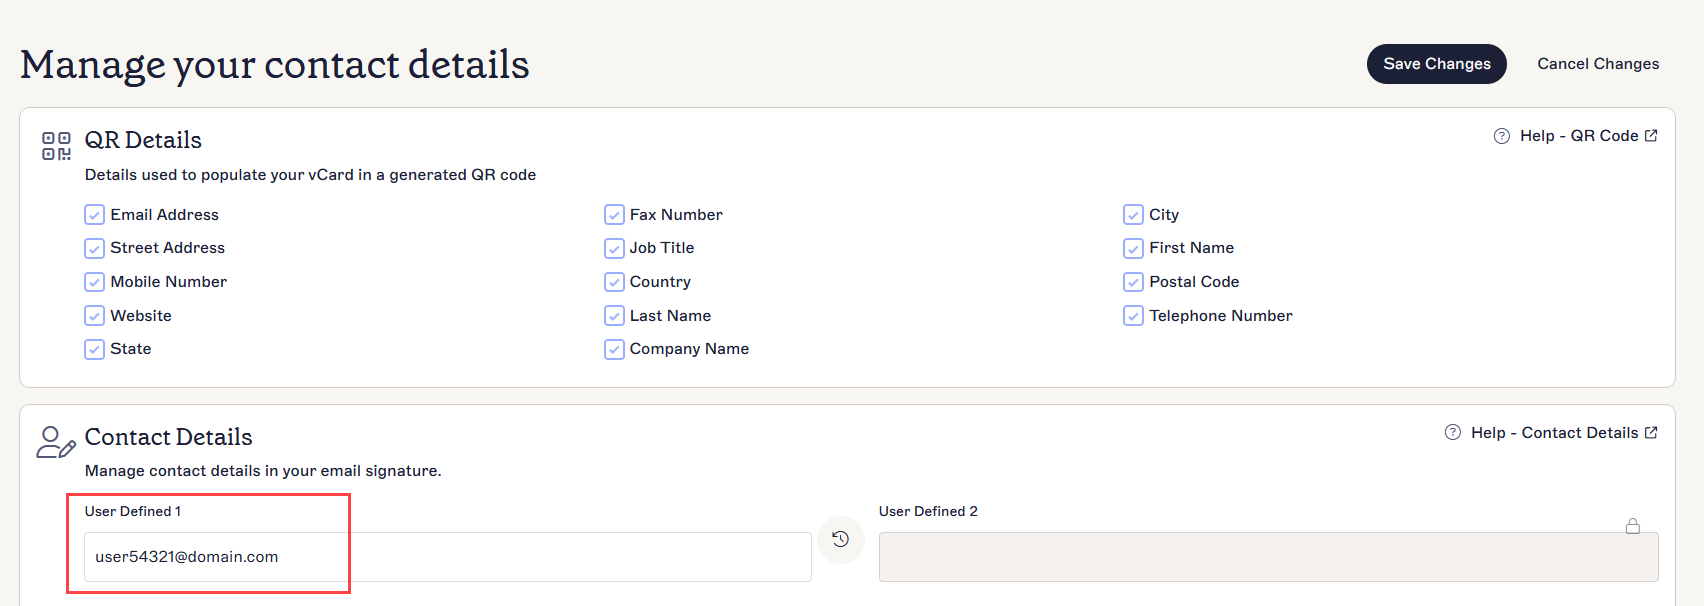
The UDE page. Enter your data in the attribute enabled for it. This example shows the dynamic part of the URL in User Defined 1.
- Select Save Changes.
- Open your signature in the Signature Designer.
- Add the required calendar element to the signature. For more information, see Working with the Calendly element, Working with the Microsoft Bookings element, or Working with the Chili Piper element.
- In the Booking page URL text box, add the static part of the URL.
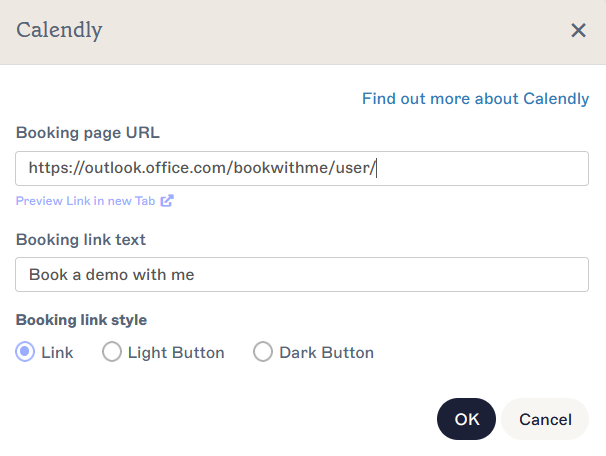
A Calendly window. The static half of the example URL ends at 'user/'. The dynamic half is added after the '/'.
- At the end of the static part of the link, enter { and begin typing the name of the custom attribute field which stores the dynamic data. Select the correct field from the autofill drop-down.
Select your new field from the autofill list.
-
Select OK to close the element window and select Save Changes to save your signature template. Your Booking page URL now directs recipients to the unique link.
Tip! You can use Visibility properties on the calendar elements so that the element only becomes visible if the field containing the dynamic part of the booking link is populated. For more information, see how to use Conditional Visibility.
This method allows an Exclaimer admin to upload a CSV file containing the user's booking links. For more information, see User Details Upload. You must add each user's booking link to the appropriate column in the CSV - for a bulk method, see the Create and add a link by genering a CSV with Powershell section of this article.
- From the header bar, select the cogwheel icon to open the Settings menu, then select Sender Management.
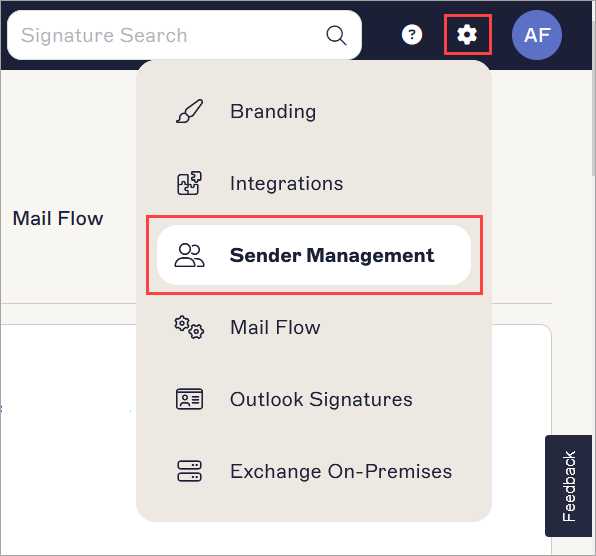
The Settings menu is found under the cogwheel icon.
- Locate the User Details Upload section and select Export Existing to export a CSV file of your existing users and their current override data.

The User Details Upload section is found on the Sender Management page. You may need to scroll.
- Open the CSV file in an appropriate program, such as Microsoft Excel.
-
In the first empty column, enter text in the topmost cell to act as a column header. This will be the name of your field for storing the data.
NOTE: Headers must start with a letter. Full stops (.) and underscores (_) are the only special charcters permitted; all other characters must be alphanumeric.
Any mismatched header names will be treated as new columns.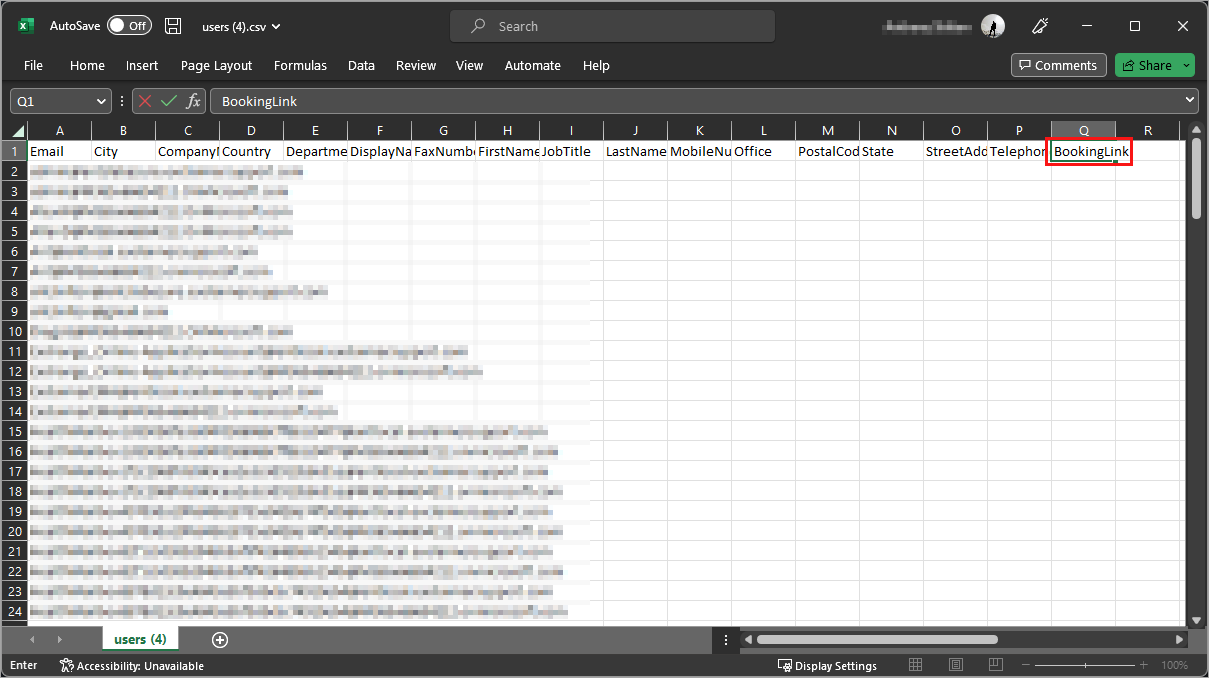
A CSV opened in Microsoft Excel. A new column header has been added for booking links.
- Populate the cells in the coloumn with the dynamic part of the booking data for each user as required.
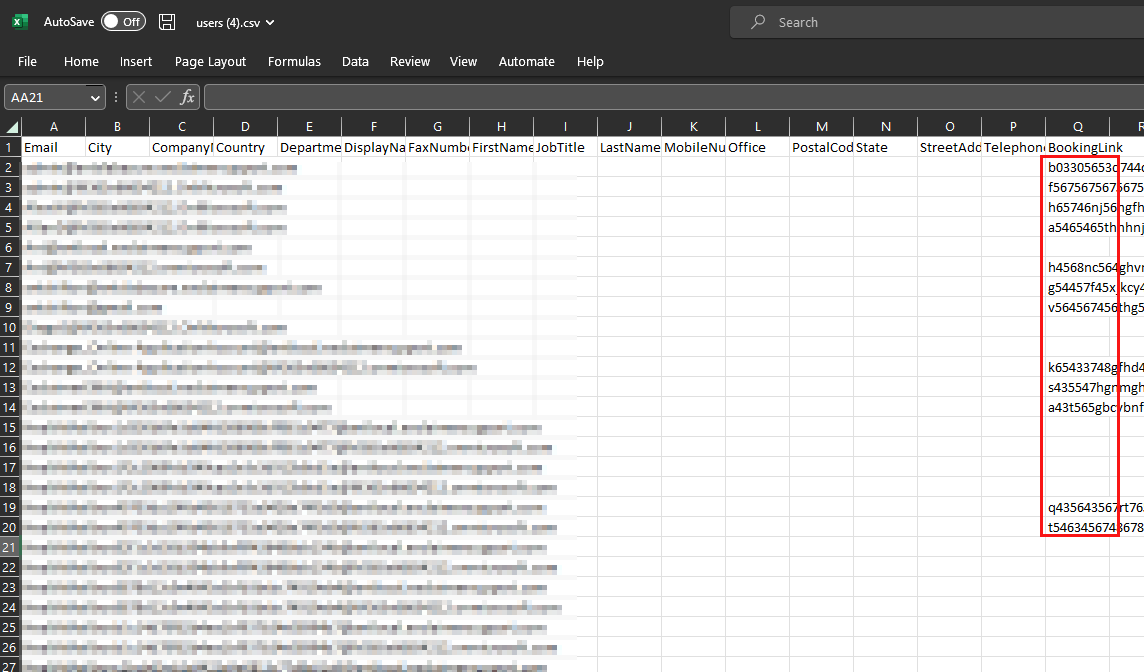
Add the unique section of the dynamic booking link in the new column for each respective user row.
- Save the CSV file.
- Return to the Sender Management page in Exclaimer. Under User Details Upload, select Update Existing, then select and open the updated CSV file to import the data.

The Update Existing button is found in the User Details Upload section.
- Open your signature in the Signature Designer.
- Add the required calendar element to the signature. For more information, see Working with the Calendly element, Working with the Microsoft Bookings element, or Working with the Chili Piper element.
- In the Booking page URL text box, add the static part of the URL.
A Calendly window. The static half of the example URL ends at 'user/'. The dynamic half is added after the '/'.
- At the end of the static part of the link, enter { and begin typing the name of the custom attribute field which stores the dynamic data. Select the correct field from the autofill drop-down.
Select your new field from the autofill list.
-
Select OK to close the element window and select Save Changes to save your signature template. Your Booking page URL now directs recipients to the unique link.
Tip! You can use Visibility properties on the calendar elements so that the element only becomes visible if the field containing the dynamic part of the booking link is populated. For more information, see how to use Conditional Visibility.
This method allows an Exclaimer admin to upload a CSV file containing the user's booking links. For more information, see User Details Upload. The CSV is generated by running a Powershell script to export all the dynamic booking IDs in bulk.
- Open Windows Powershell.
-
Enter and run the following script:
Set-ExecutionPolicy -Scope Process -ExecutionPolicy Bypass; Invoke-WebRequest -Uri "https://raw.githubusercontent.com/exclaimerltd/Internal-Support-Scripts/master/MSBookingGuid.ps1" -OutFile "$env:TEMP\MSBookingGuid.ps1"; & "$env:TEMP\MSBookingGuid.ps1" - When prompted, sign in to Microsoft 365 using your Global Administrator credentials. Once signed in, you are returned to Powershell.
-
You are prompted to answer the query Do you want to limit the export to members of a specific group?
EITHER:
Enter Y to only export the booking links for users in an existing group. Enter the group email address on the following line.OR
Enter N to export the booking links for all users.
- Press Enter to generate the CSV file.
- Log into your Exclaimer subscription. From the header bar, select the cogwheel icon to open the Settings menu, then select Sender Management.
The Settings menu is found under the cogwheel icon.
- Under User Details Upload, select Update Existing, then select and open the updated CSV file to import the data.
The Update Existing button is found in the User Details Upload section.
- Open your signature in the Signature Designer.
- Add the required calendar element to the signature. For more information, see Working with the Calendly element, Working with the Microsoft Bookings element, or Working with the Chili Piper element.
- In the Booking page URL text box, add the static part of the URL.
A Calendly window. The static half of the example URL ends at 'user/'. The dynamic half is added after the '/'.
-
At the end of the static part of the link, enter:
{MSBookingGUID.Select the corresponding field from the autofill drop-down.
-
Select OK to close the element window and select Save Changes to save your signature template. Your Booking page URL now directs recipients to the unique link.
Tip! You can use Visibility properties on the calendar elements so that the element only becomes visible if the field containing the dynamic part of the booking link is populated. For more information, see how to use Conditional Visibility.