
Scenario
You have created your signature and want some of your template content, such as individual elements, tables, or groups, to only be visible to recipients under certain conditions. For example, displaying different elements for different domains, adding content that only appears for specific senders without creating a new template, or hiding a field if the user information is blank.
Resolution
When you add a signature element to your template in the Signature Designer, you can use the Visibility section of the Properties pane to set display conditions for that element. You can also set visiblity properties for a table, table cell, or group.
Select an option below to view the related instructions:
To set an element's visibility:
- Open your signature in the Signature Designer.
- Select your content (element, table, cell, or group) on the canvas.
- In the Properties pane, expand Visibility.

Select your element and open the Visibility properties.
- Select the Visible when radio button.
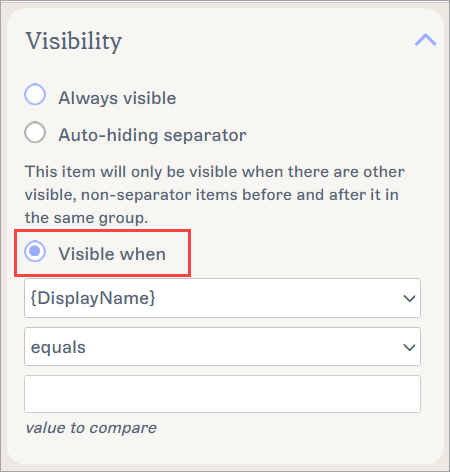
The Visible when button applies a condition under which your element will appear.
- From the first drop-down, select an attribute.
- From the second drop-down, select a condition for that attribute.
The following conditions are available:
- is empty - the content will only appear in the signature when there is no data for the attribute.
- is not empty - the content will only appear in the signature when there is data for the attribute.
- equals - the content will only appear in the signature when the data for the attribute matches a certain value exactly.
- does not equal - the content will only appear in the signature when the data for the attribute does not match a certain value exactly.
- contains - the content will only appear in the signature when the data for the attribute has a certain value anywhere in it.
- does not contain - the content will only appear in the signature when the data for the attribute does not have a certain value anywhere in it.
- starts with - the content will only appear in the signature when the data for the attribute begins with a certain value.
- does not start with - the content will only appear in the signature when the data for the attribute does not begin with a certain value.
- ends with - the content will only appear in the signature when the data for the attribute ends with a certain value.
-
does not end with - the content will only appear in the signature when the data for the attribute does not end with a certain value.
- If you are not using is empty or is not empty, the text field is enabled. Enter your text for the condition to check for.
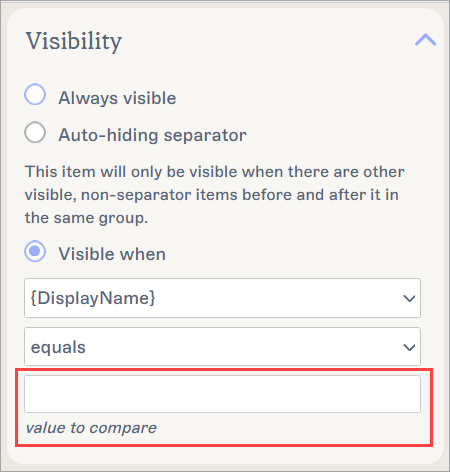
The entry field is only available after you have selected a condition other than is empty/is not empty.
Tip! To set visibility based on domain, choose {Email}, then contains/does not contain or ends with/does not end with, then enter the@[domain] section of the email address.- Select Save Changes to save you template. The element will now only appear if the condition and/or text you chose is met when sending the email.
Using conditional visibility on the User Photo elementThe User Photo element does not include Visibility in the Properties pane. However, you can set Visibility conditions for a user photo by applying visibility properties to a group or table cell containing a User Photo element.
NOTE: This will also affect any other elements inside the group or table cell.To set visibility properties for a User Photo element:
- Open your signature in the Signature Designer.
- Drag the User Photo element inside the borders for a group (shown by red border lines) or a table cell (shown by green border lines). For more information on understanding how to use group and table borders, see Colored borders, grouping, and inherit properties in the Signature Designer.
NOTE Adding your user photo to a group will mean that any visiblity properties are applied to all elements in that group. To control visibility for only the user photo, add it to a table cell on its own or delete the other elements in the group. - Select the colored border for the group (red) or table cell (green) containing the User Photo element.
- In the Properties pane, expand Visibility.
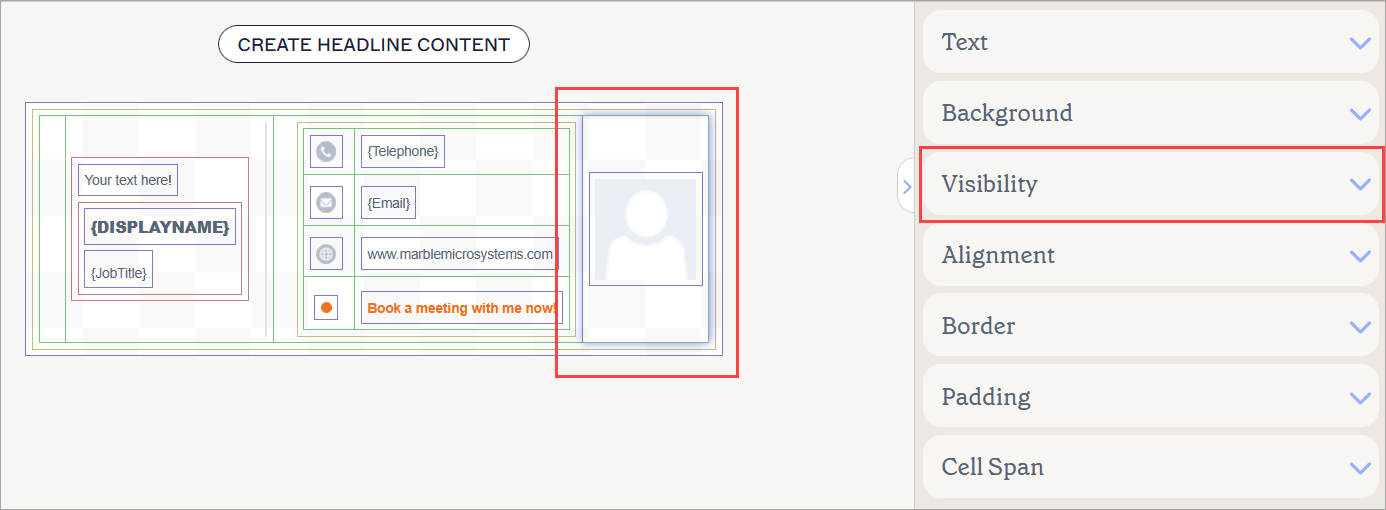
A User Photo inside a table cell, shown by the green border. The Visibility section is available for the table cell.
- Select the Visible when radio button.
The Visible when button applies a condition under which your element will appear.
- From the first drop-down, select an attribute.
- From the second drop-down, select a condition for that attribute.
The following conditions are available:
- is empty - the content will only appear in the signature when there is no data for the attribute.
- is not empty - the content will only appear in the signature when there is data for the attribute.
- equals - the content will only appear in the signature when the data for the attribute matches a certain value exactly.
- does not equal - the content will only appear in the signature when the data for the attribute does not match a certain value exactly.
- contains - the content will only appear in the signature when the data for the attribute has a certain value anywhere in it.
- does not contain - the content will only appear in the signature when the data for the attribute does not have a certain value anywhere in it.
- starts with - the content will only appear in the signature when the data for the attribute begins with a certain value.
- does not start with - the content will only appear in the signature when the data for the attribute does not begin with a certain value.
- ends with - the content will only appear in the signature when the data for the attribute ends with a certain value.
-
does not end with - the content will only appear in the signature when the data for the attribute does not end with a certain value.
- If you are not using is empty or is not empty, the text field is enabled. Enter your text for the condition to check for.
The entry field is only available after you have selected a condition other than is empty/is not empty.
Tip! To set visibility based on domain, choose {Email}, then contains/does not contain or ends with/does not end with, then enter the@[domain] section of the email address.- Select Save Changes to save you template. The User Photo will now only appear if/when the condition and/or text you chose is met when sending the email.
Using advanced conditional visibilityYou cannot set more than one condition for visiblity on an element, but you can create an 'Or' condition by adding multiple elements to the template, then using Visibility properties to adjust the conditions under which each one is displayed. See the Examples of advanced conditional visibility section following these instructions for a demonstration of some custom scenarios using this method.
To set up advanced visibility to display different content for different attributes:
- Open your signature in the Signature Designer.
- Add all the variants for elements, tables, cells, or groups you wish to apply conditions for to your canvas.
Tip! This may make your template look overcrowded or appear to distort your structure, but when you apply the visiblity settings, the finished signature will return to normal. Use the Preview pane to check how your signature will look after you apply conditional visiblity.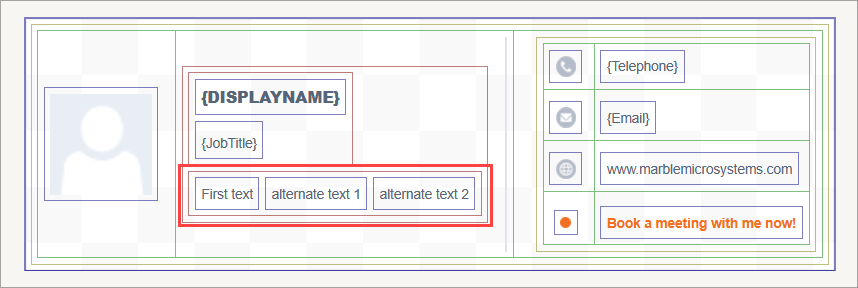
An example of three text elements inside a group. Each one will have conditional visiblity applied to control which one appears when.
- Select your first piece of content on the canvas.
- In the Properties pane, expand Visibility.
Select your element and open the Visibility properties.
- Select the Visible when radio button.
The Visible when button applies a condition under which your element will appear.
- From the first drop-down, select an attribute.
- From the second drop-down, select a condition for that attribute.
The following conditions are available:
- is empty - the content will only appear in the signature when there is no data for the attribute.
- is not empty - the content will only appear in the signature when there is data for the attribute.
- equals - the content will only appear in the signature when the data for the attribute matches a certain value exactly.
- does not equal - the content will only appear in the signature when the data for the attribute does not match a certain value exactly.
- contains - the content will only appear in the signature when the data for the attribute has a certain value anywhere in it.
- does not contain - the content will only appear in the signature when the data for the attribute does not have a certain value anywhere in it.
- starts with - the content will only appear in the signature when the data for the attribute begins with a certain value.
- does not start with - the content will only appear in the signature when the data for the attribute does not begin with a certain value.
- ends with - the content will only appear in the signature when the data for the attribute ends with a certain value.
-
does not end with - the content will only appear in the signature when the data for the attribute does not end with a certain value.
- If you are not using is empty or is not empty, the text field is enabled. Enter your text for the condition to check for.
The entry field is only available after you have selected a condition other than is empty/is not empty.
Tip! To set visibility based on domain, choose {Email}, then contains/does not contain or ends with/does not end with, then enter the@[domain] section of the email address.- Select your next piece of alternate content on the canvas.
- Repeat steps 4-8 to set the visibility conditions for this content. You can repeat this process for as many elements as you wish to control the visibility for.
- Select Save Changes to save your template. Each of the elements you set a condition for will now only appear if/when the condition and/or text you chose is met when sending an email.
Examples of advanced conditional visibilityThe following three examples are sample scenarios to show some of the possible ways advanced conditional visiblity can be used to control when and how your template content appears to recipients. You do not have to follow these scenarios exactly and can adjust your template to control visibility for your own content as required.
Different banners for different domains:
There are two banners in the signature template.
One banner has the following visibility properties:
Visible when > {Email} > contains >
@domain1.comThe second banner has the following visibility properties:
Visible when > {Email} > contains >
@domain2.comThe result is that the first banner will only appear in emails sent from the first domain. The second will only appear in emails sent from the second domain. Any emails sent from domains that are not [domain1] or [domain2] will have no banners. The rest of the template remains the same for all domains.
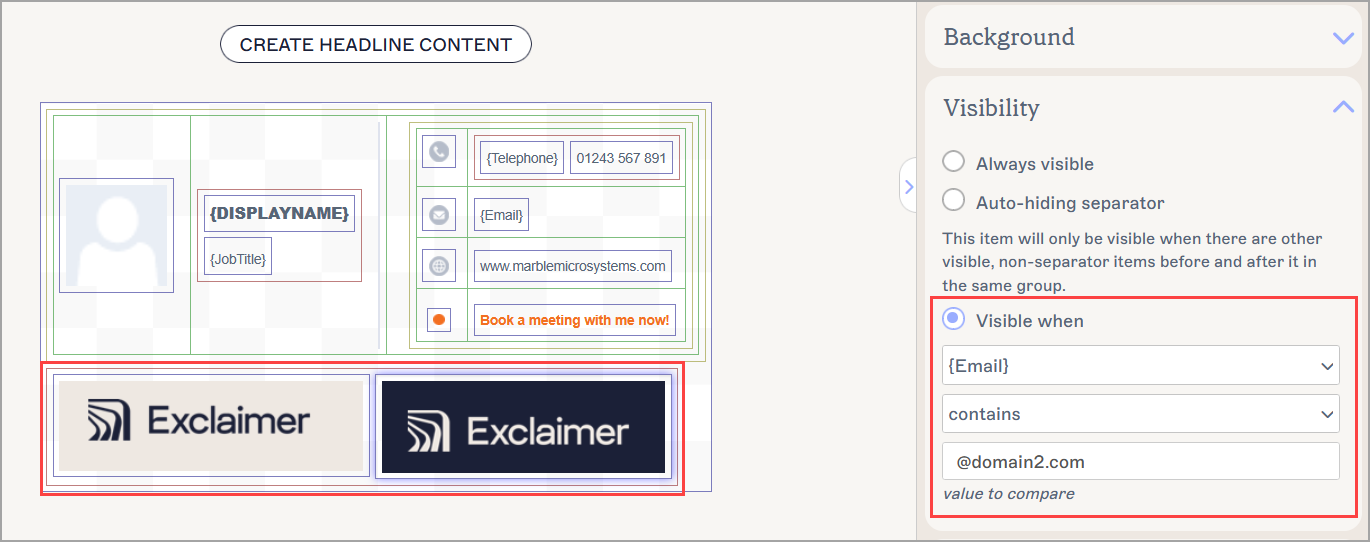
An example of two banners in the template. The visibility properties show that conditions control which one appears in the signature.An alternate phone number:
There is a Contact {Fields} element in the signature template using the {Telephone} field to add each sender's phone number from their synchronized user data or the User Details Editor. Some senders do not have a phone number in their user data, so a Text element is added to the signature in the same group with a manually entered alternate phone number.
The Contact {Fields} element has the following visibility properties:
Visible when > {Telephone} > is not empty
The Text element has the following visibility properties:
Visible when > {Telephone} > is empty
The result is that when a sender has {Telephone} data in their user data, that number appears in their signature. When a sender does not have that data, the alternate number appears in their signature. The rest of the template remains the same.
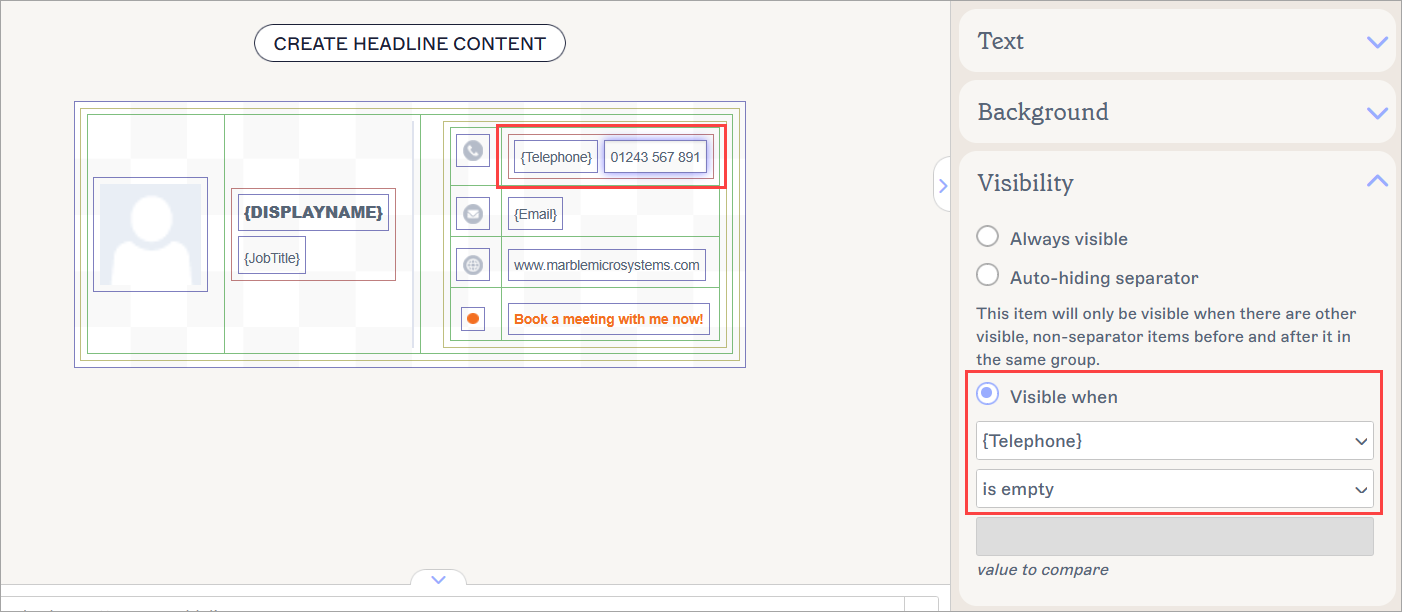
An example of a Contact {Fields} and a Text element in the signature. The visibility properties show that conditions control which one appears in the signature.
Text in multiple languages:
There are three Registered Office elements in the signature template. One contains the liability text in English, one contains the same text in Irish Gaelic, and one contains the same text in Welsh.
The Registered Office element in English has the following visibility properties:
Visible when > {Country} > equals >
EnglandThe Registered Office element in Irish Gaelic has the following visibility properties:
Visible when > {Country} > equals >
IrelandThe Registered Office element in Welsh has the following visibility properties:
Visible when > {Country} > equals >
WalesThe result is that when the country in a sender's user data is England, Wales, or Ireland, only the corresponding Registered Office element appears in the signature. If a user's country is not England, Wales, or Ireland, or is blank, no Registered Office element appears in the signature. The rest of the template remains the same.
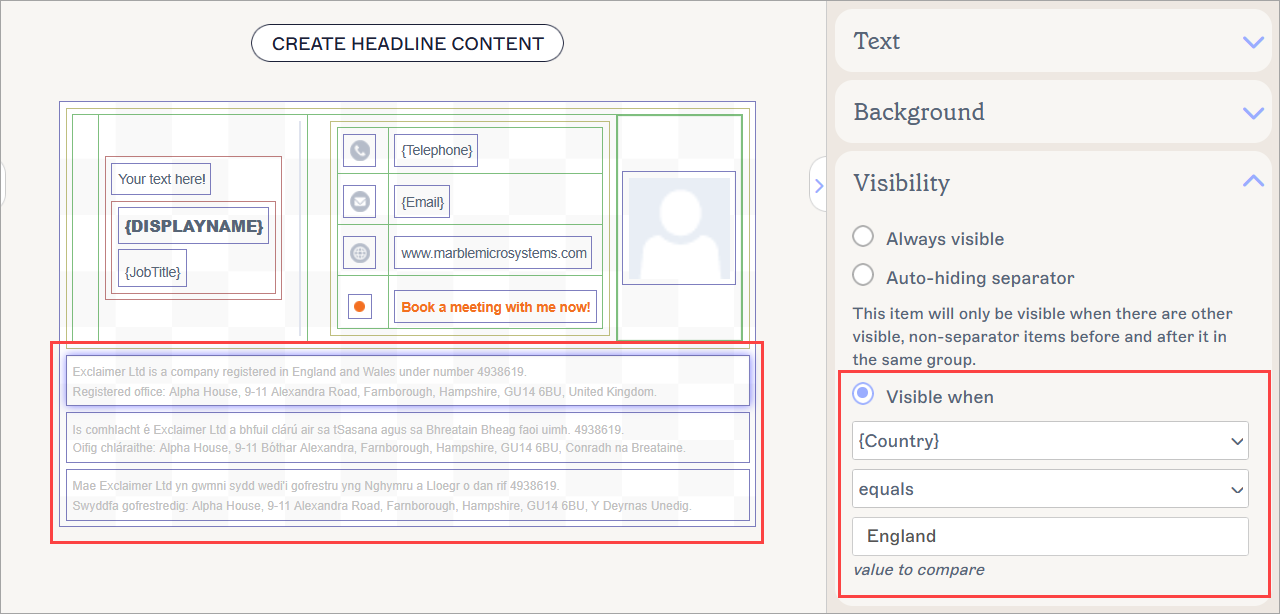
An example of three Registered Office texts in the template. The visibility properties show that conditions control which one will appear in emails. - Select your next piece of alternate content on the canvas.