
Scenario
When sending or receiving an email, you notice that the images in your signature appear blurry or low in quality.
Reason
The quality of the image depends upon several factors, such as:
- The image resolution
- The image dimensions and re-sizing
- The image file format
- The display resolution of your screen
- The Zoom settings on your device
- If your signature is rendered as a bitmap, for example, due to using custom fonts or background images.
Resolution
Some tips to help you resolve image quality issues:
The resolution of the image affects how clearly it is displayed. We recommend that images be between 72 and 150 DPI. 96 DPI is optimal.
You can use tools such as Photoshop, MS Paint, or GIMP to check the resolution of an image.
To check an image's resolution in MS Paint:
- Open your image file in MS Paint.
- Navigate to File > Image properties.
The DPI is displayed next to Resolution.
If your image is lower than 72 DPI, then it is advisable to recreate or enhance it in a tool like Adobe Photoshop.
If you have access to Adobe tools, you can use Adobe Illustrator and Adobe Photoshop to increase the DPI/PPI value of an image. This increases its sharpness.
To edit an image with Adobe tools:
- Open your image in Adobe Illustrator and select it on the canvas.
- If your image is a PNG or JPG, select Image Trace in the Properties panel, then select Default.
Select Image Trace.
- Open the Object menu and select Expand.
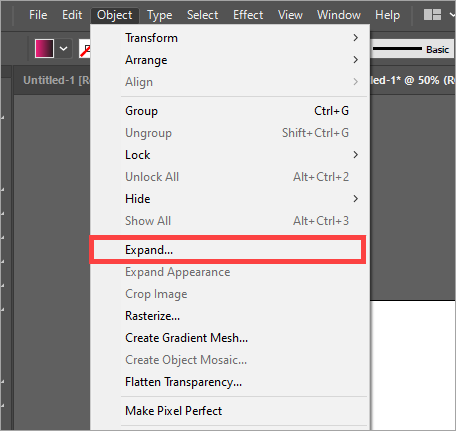
Select Expand.
-
Open the Object menu and select Make Pixel Perfect.
NOTE: This may not be suitable for thinner taglines. If your image looks strange, undo this setting.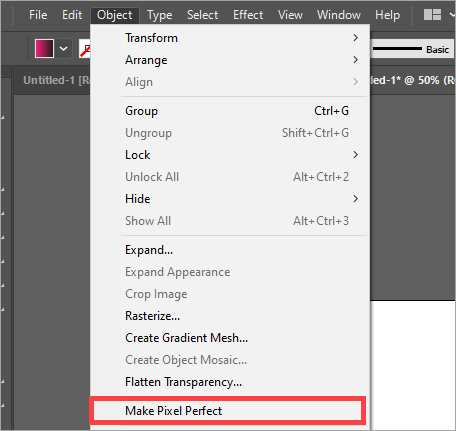
Select Make Pixel Perfect.
- Select the whole canvas and open the right click menu, then select Collect for Export > As Single Asset. This opens the Asset Export window.
- [Optional] Enter a name for your asset by selecting the text following the thumbnail image.
- Under Scale, select the arrow to open the drop-down, then select Resolution.
- Enter a value in PPI in the text field. We recommend a value between 150 and 300 PPI.
- Select the thumbnail image, then select Export to save your image to your device.
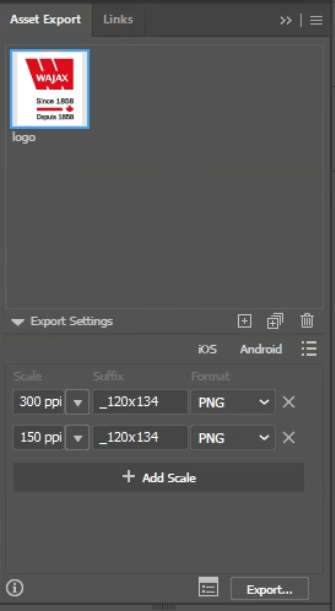
The Export window with PPI values set.
- Open the exported image file in Photoshop.
- In the Layers view, open the right click menu for the image layer and select Convert to Smart Object.
-
Open the Image menu, then select Image Size...
NOTE: You may notice that your image has doubled in size. This is normal, as the export from Illustrator is as a high-resolution image.
The Image Size window.
- Enter your required pixel values in Width and Height.
- Select Ok.
- Export your new image as a PNG for use with Exclaimer.
Enlarging or reducing the size of images will also reduce the quality of the image. Images may appear pixelated.
To prevent this issue, make sure your image files are the same size that you want to display at when you upload them - for example, if you want your image to display at 100x100px, then create or resize your image file to be that size.
Check your image dimensions:
- Right-click on your image file and select Properties (Windows devices) or Get info (Mac devices).
- Open the Details tab (Windows) or More info (Mac). The image size in pixels is listed in Dimensions.
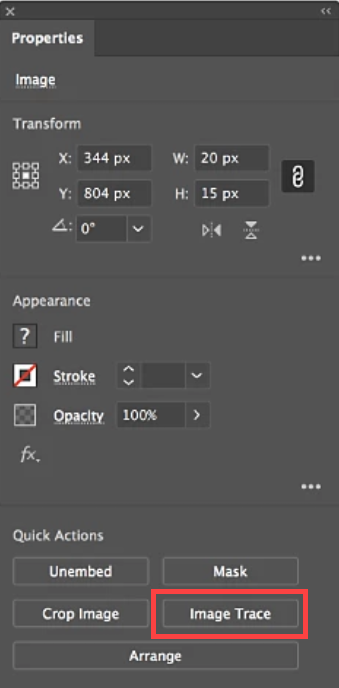
- In the Signature Designer, open your signature and select the image. Expand the Size menu in the Properties pane. The values under Width and Height are the image size in pixels.
- If the dimensions in your signature template do not match the dimensions of the original image file, re-upload an image with matching pixel values.
In Photoshop it is possible to preserve the quality by converting the image into a smart object by navigating to Layer › Smart Object › Convert to Smart Object. If you are using Microsoft Paint or GIMP, then it is not possible to preserve image quality when resizing.
PNG is a lossless image file format designed for transferring images on the internet and is an ideal format for use within email signatures. PNG also supports transparency, making it ideal for use with company logos and other graphics in your signature. Save your image as .png to use the PNG format.
The best way to make images look better on high-resolution displays is to create them at a larger size. However, this can have an opposite effect on devices with lower resolution displays. Similarly, a widescreen HD display will have a different output to a small mobile device, for example.
Consider what type of displays you want to optimize your images for when creating and uploading them. There is no one way to maximize quality on every type of possible display.
If you render your signature or signature content as a bitmap, it becomes a bitmap image that can be affected by quality issues when displayed.
If you use custom fonts or background images in your signature, your signature will automatically be rendered as a bitmap. This is to ensure the font and/or image can be displayed across all devices. To avoid rendering your signature as a bitmap, use font stacks instead of custom fonts and remove background images.
For instructions on using font stacks, see How to use font stacks in Exclaimer.