
Scenario
You have an existing signature template that you want to add personal details to, but you would like to add information not found in the standard user data fields, such as pronouns, specific qualifications and/or accreditations, or working days.
Resolution
To resolve this issue, you can follow any one of the solutions described below:
This option is helpful if you are entering data for a single user.
- Add a Text element to your signature design template.
Add a Text element to wherever you would like it to be in the template.
- Enter your data into the text element.
- Select the text element, then expand the Visibility section in the Properties pane. Select Visible when and enter the desired values to set the text box's visibility based on attributes such as the user's display name. This means that when the associated attribute is used in a signature, the text box will become visible to the recipient.

An example of visibility using display name. You can use any visibility criteria to affect when your data is displayed.
- Select Save Changes to save your signature template.
This option is helpful if you need to edit the signature for multiple users. For more information about Microsoft 365's Custom Attributes, see Synchronize Additional User Attributes.
- Create a custom attribute using the most appropriate method (AD connect, Microsoft 365, or Google) from How to create and add data to custom attributes.
- Open your signature in the Signature Designer.
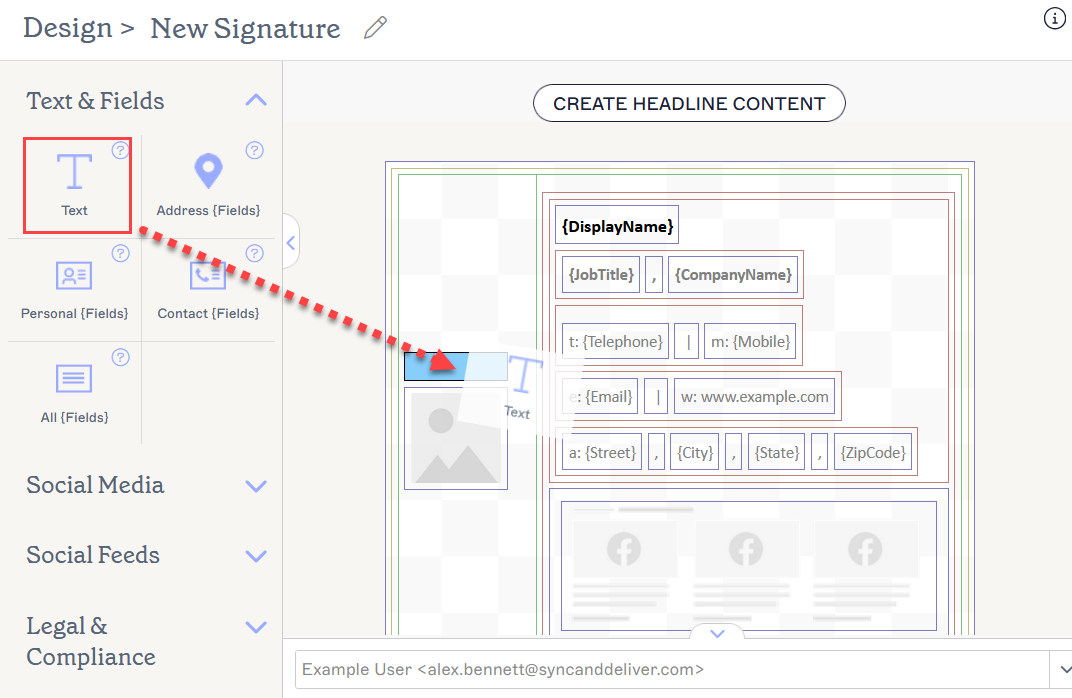
- Drag and drop the All {Fields} element onto the canvas at your desired location. The All {Fields} window is displayed.
- From the Field drop-down list, select your custom attribute. You can use any single-value field from the local directory.
For more information, see Which fields are multi-value and cannot be synced to Exclaimer?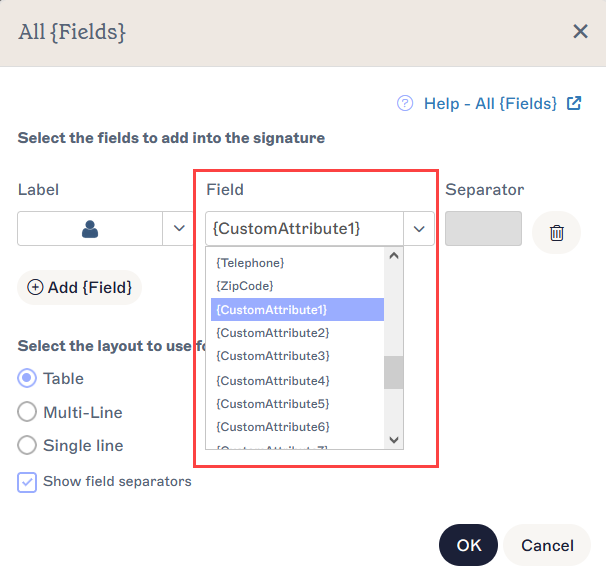
The custom attributes are found in the field drop-down.
- Select Save Changes to save your signature template.
This option uses the User Details Upload feature to create a field in the User Details Editor.
The Starter plan and Signature Management Cloud Plan do not have access to the user-editable contact details.
The Standard plan has access to two editable contact fields.
The Pro plan and any Marketing Cloud subscriptions purchased before April 2023 have access to an unlimited number of editable fields. For more information on pricing plans, see Exclaimer Pricing Plans.
- From the header bar, select the cogwheel icon to open the Settings menu, then select Sender Management.
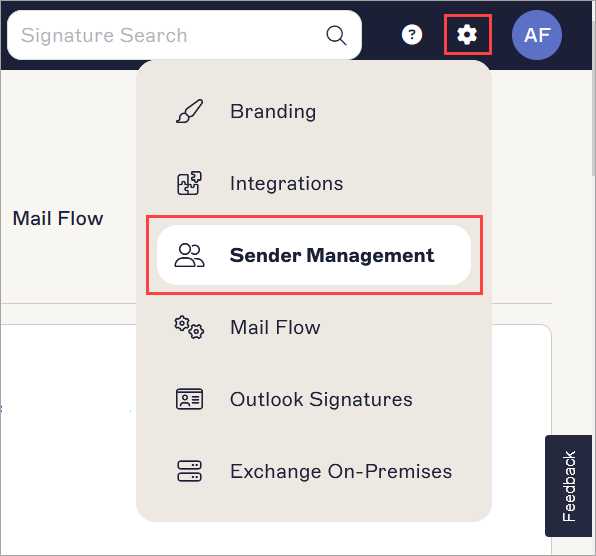
The Settings menu is found under the cogwheel icon.
- From the User Details Upload section, select Export Existing.

Select Export Existing to download a CSV of user data.
- Open the downloaded CSV file and add the title of your new field in the first cell of a new blank column.
-
Add data for at least one user in the new column.
NOTES:
When editing the CSV file:
- The CSV must contain only individual users. You cannot import groups, group memberships, and domains.
- Do not edit existing headers.
- Column headers must start with a letter followed by alphanumeric characters. Only . and _ special characters are allowed.
- Max file size: 150MB
- Max Columns: 100
- Max Field Length: 255
-
Max Value Length: 256.
- Save the CSV as a UTF-8 (Unicode Transformation Format 8) file.
- Return to Exclaimer and, from the User Details Upload section, select Update Existing. Upload the CSV file.
- Log in to the User Details Editor as a Global Administrator or Super Admin. For more information, see Manage settings for user editable contact details.
- Select Settings.
- In the Define User Editable Contact Details section, select the checkbox for the new field that you named. This enables users to enter data into this field.
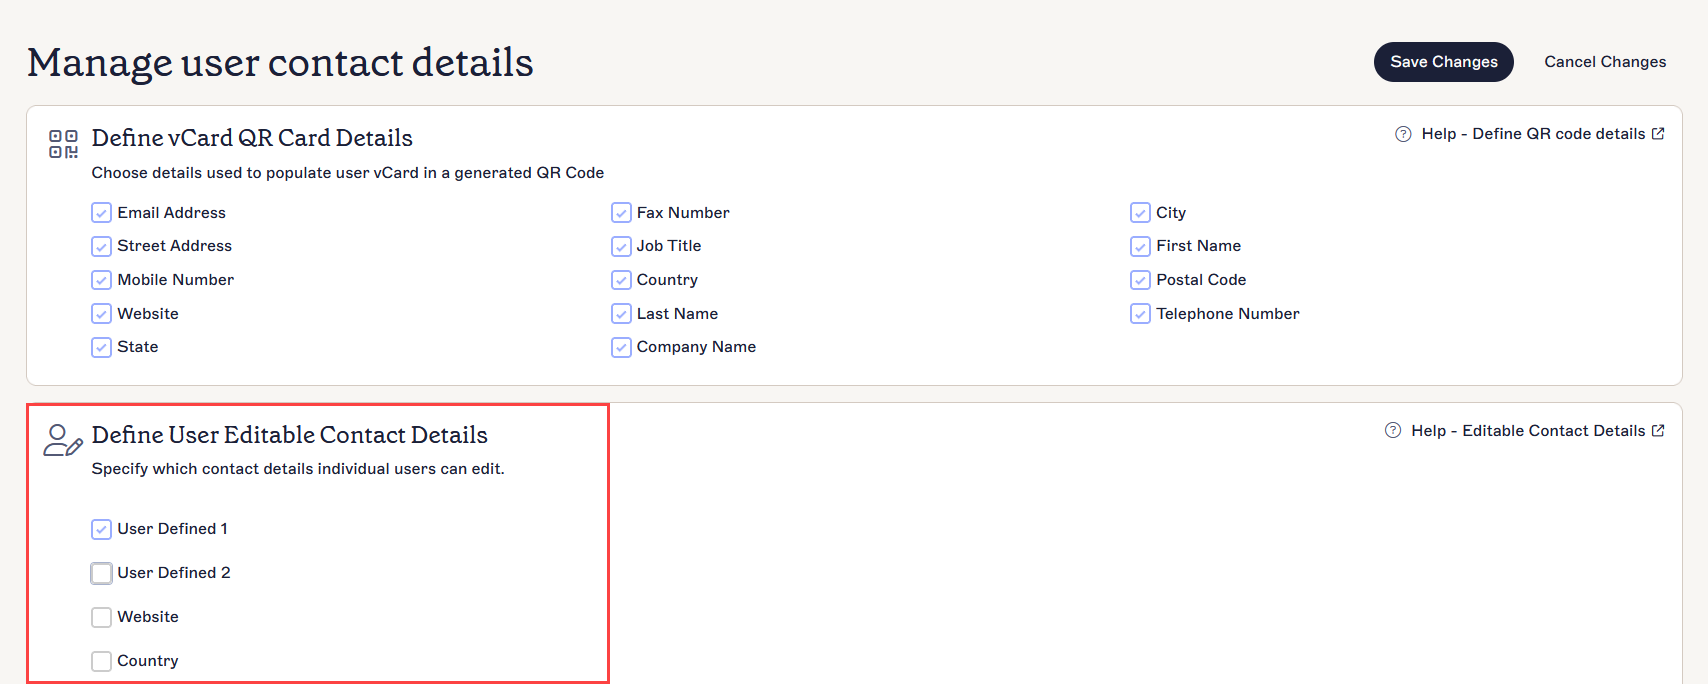
On the Settings page, locate your new field and select the checkbox for it. This example is showing User Defined 1, but yours may be named differently.
- Select Save Changes.
- Either return to the Contact Details page of the User Details Editor or log in as an end user. For more information on using the User Details Editor as an end user, see Manage your contact details.
- Add data to the new field and select Save Changes.
- Return to Exclaimer and open your signature in the Signature Designer.
- Drag and drop the All {Fields} element onto the canvas at your desired location. The All {Fields} window is displayed.
- From the Field drop-down list, select your new field.
The custom attributes are found in the field drop-down. This example shows the standard list of custom attributes, but yours may be named differently.
- Select Save Changes to save your signature template.