
Szenario
Benutzer senden E-Mails von einem gemeinsamen Postfach, möchten aber in der Lage sein, bei einigen E-Mails eine persönliche Signatur anzuwenden.
Lösung
Bei der Client-seitigen Bereitstellung können Sie eine persönliche Signatur mit dem Exclaimer Outlook Add-In anwenden. Bei der Server-seitigen Bereitstellung können Sie eine persönliche Signatur über Exchange Online anwenden.
Ihre E-Mail-Adresse und die E-Mail-Adresse des gemeinsamen Postfachs müssen Teil derselben Microsoft 365-Mandantenumgebung sein, um persönliche Signaturen beim Senden aus einem gemeinsamen Postfach verwenden zu können.
Wählen Sie unten eine Option, um die zugehörigen Anweisungen anzuzeigen:
So wenden Sie eine persönliche Signatur mit Client-seitig an:
- Öffnen Sie Outlook und wählen Sie Neue E-Mail aus.
-
Wählen Sie das Feld Von aus, um das Dropdown-Menü zu öffnen, und wählen Sie dann Andere E-Mail-Adresse...
HINWEIS: Wenn Sie das Feld Von nicht sehen, wählen Sie im Menüband Optionen und aktivieren Sie dann das Kontrollkästchen Von anzeigen, um es zu aktivieren.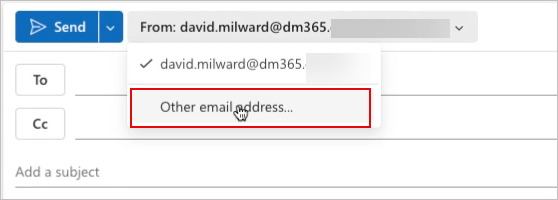
Wählen Sie das Feld Von aus, dann Andere E-Mail-Adresse...
- Geben Sie die E-Mail-Adresse des freigegebenen Postfachs ein.
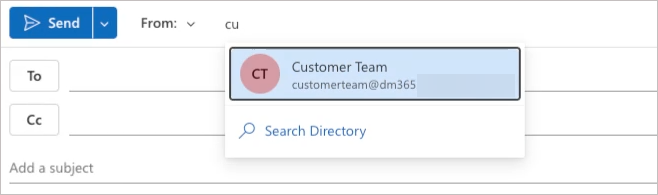
Geben Sie die E-Mail-Adresse des freigegebenen Postfachs ein.
- Geben Sie im Feld An die E-Mail-Adresse des Empfängers ein. Dadurch werden die verfügbaren Signaturen gefiltert, indem alle Signaturregeln überprüft werden, die beeinflussen können, welche verwendet werden dürfen.
- Wählen Sie das Nachricht-Menüband und öffnen Sie das Exclaimer Outlook Add-In, indem Sie das Symbol oder die Schaltfläche mit dem Exclaimer-Logo auswählen. Dies kann je nach Ihrer Outlook-Version variieren (z. B. Outlook Web oder Desktop). Weitere Informationen finden Sie unter Verwendung des Exclaimer Outlook Add-Ins.
Melden Sie sich bei Aufforderung bei Ihrem Microsoft 365-Konto an.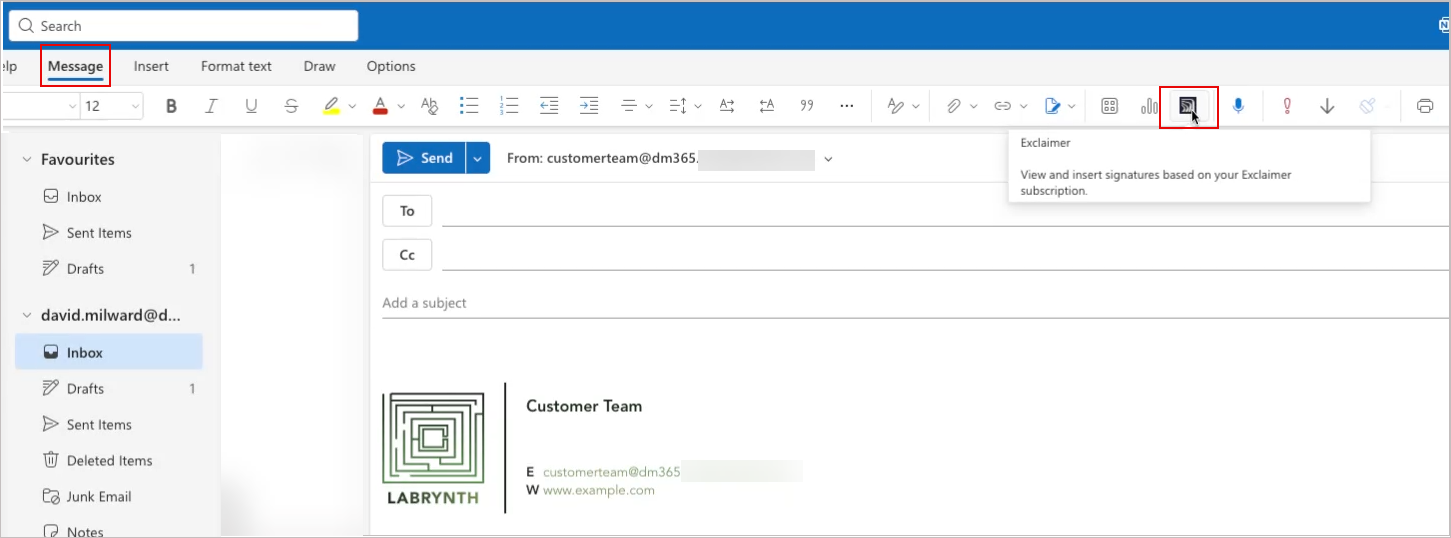
Ein Beispiel, das das Exclaimer-Symbol im Nachricht-Menüband zeigt. Dies kann als Schaltfläche mit der Bezeichnung Exclaimer erscheinen.
-
Wählen Sie im Add-In-Bereich das Dropdown-Menü aus und dann Ihre persönliche E-Mail-Adresse. Dadurch werden Ihre verfügbaren persönlichen Signaturen angezeigt.
HINWEIS: Wenn Sie das Dropdown-Menü nicht sehen, stellen Sie sicher, dass Sie Schritt 3 abgeschlossen haben.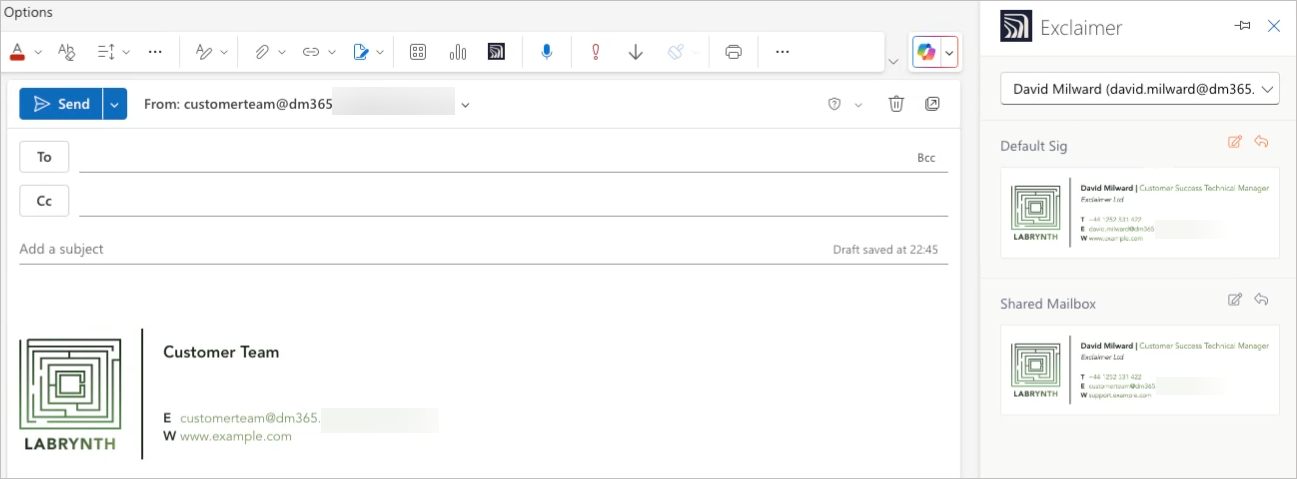
Wählen Sie Ihre E-Mail aus, um Ihre Signaturen anstelle der Signaturen des freigegebenen Postfachs anzuzeigen.
- [Optional] Um Ihre persönliche Signatur als Standardsignatur festzulegen, die automatisch angewendet wird, wählen Sie die Symbole über der Signatur aus. Das Stiftsymbol legt diese Signatur als Standard für neue Nachrichten fest, und das Pfeilsymbol für Antworten/Weiterleitungen. Weitere Informationen finden Sie unter So legen Sie Standardsignaturen und Antwortsignaturen für Client-Side mit Microsoft 365-Abonnements fest.
HINWEIS: Möglicherweise müssen Sie die Symbole abwählen und erneut auswählen, um sicherzustellen, dass dieser Standard gesetzt ist. Um dies zu überprüfen, fahren Sie nach dem Festlegen mit der Maus über das/die Symbol(e). Wenn ein Text-Tooltip mit dem Beginn „Als Benutzerstandard entfernen“ erscheint, wurden Ihre Standards gesetzt.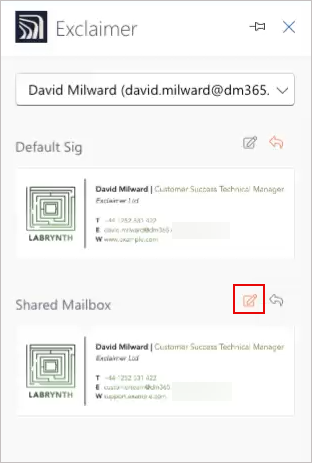
Mit den Symbolschaltflächen können Sie eine Signatur als Standard festlegen.
- Wählen Sie eine Signatur aus dem Bereich aus. Diese wird auf Ihre E-Mail angewendet. Wenn Sie die E-Mail senden, wird Ihre gewählte persönliche Signatur anstelle einer Signatur aus dem gemeinsamen Postfach verwendet.
So wenden Sie eine persönliche Signatur serverseitig an:
- Melden Sie sich im Exchange Admin Center mit Global Administrator-Anmeldedaten an.
- Wählen Sie im Menü auf der linken Seite Empfänger und dann Postfach aus.
- Wählen Sie das freigegebene Postfach aus der Liste aus.
- Wählen Sie im Bereich Details Im Auftrag senden, um Benutzern zu erlauben, E-Mails im Namen ihres persönlichen Kontos vom freigegebenen Postfach zu senden.
- Melden Sie sich bei Exclaimer an.
- Wählen Sie in der Kopfzeile das Zahnradsymbol, um das Menü Einstellungen zu öffnen, und wählen Sie dann Mail Flow.
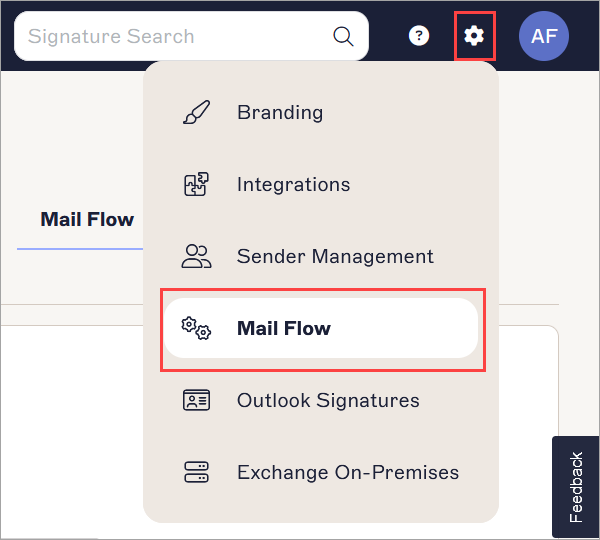
Das Einstellungsmenü befindet sich unter dem Zahnradsymbol.
- Deaktivieren Sie im Abschnitt Im Auftrag senden das Kontrollkästchen „Im Auftrag senden“-Absender verwenden und wählen Sie dann Speichern.

Der Abschnitt „Im Auftrag senden“.