
Description
Once you have successfully created an Exclaimer subscription, you can view the subscription details in the Exclaimer portal.
Only the subscription Owner can view and edit all available subscription details. If you cannot view or access a particular aspect of the subscription details, ensure you are logged in as the subscription Owner. For more information on roles and permissions, see User Management.
How to access it
To access the subscription details:
- Log into your Exclaimer subscription as an Owner or Admin. If you have multiple subscriptions, skip to Step 3. If you have only one subscription, your subscription is automatically launched.
- In the header bar, select the initials icon to open the Account menu and select Change Subscription. This opens the subscription(s) Overview.
-
Select Manage next to your subscription.
The Subscription details section displays the available details.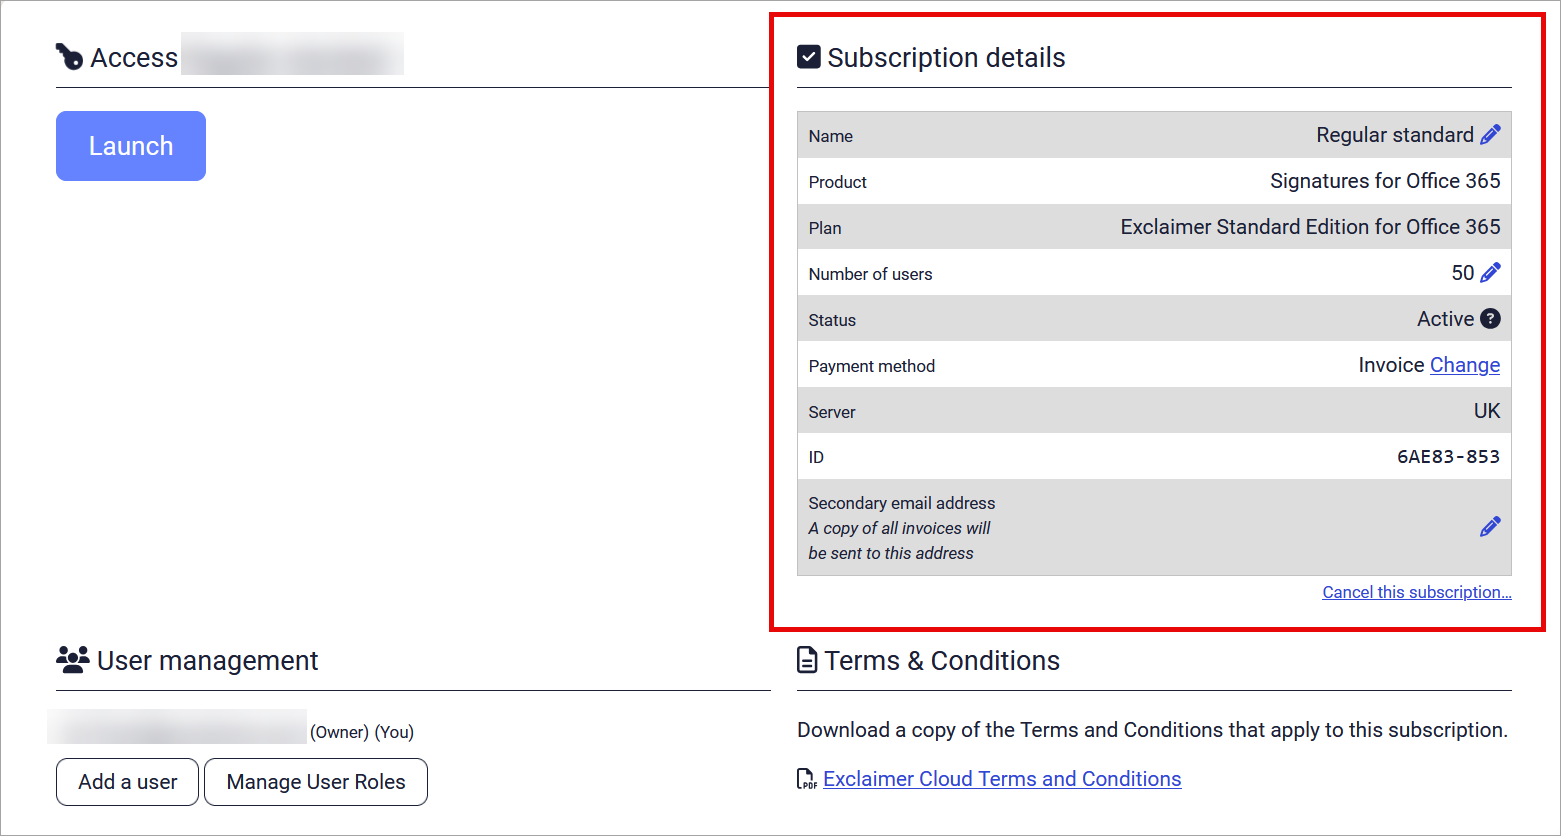
An example of the subscription details for a subscription as they appear to the Owner.NOTE: Only users with the Owner or Admin role can access the Manage button.
Understanding your subscription details
The following table describes the different fields displayed in the Subscription details section:
| Row name | Details |
| Name |
Displays the name of your Exclaimer subscription. Names are assigned by default. To edit the subscription name, select the NOTE: Only the subscription Owner can edit the subscription name. |
| Product |
Displays the product type you have, such as 'Signatures for 365' or 'Signatures for G Suite'. This is not the same as the Plan. |
| Plan |
Displays the name of the Exclaimer pricing plan you are subscribed to. For more information on pricing and available plans, see Exclaimer pricing plans. This is not the same as the Product. |
| Number of users | Displays the number of mailboxes that have Exclaimer Signatures added to their emails via your Exclaimer subscription. |
| Status |
Displays the status of your Exclaimer subscription, such as Active, On trial, Cancellation Pending, or Cancelled. Trial subscriptions also display the number of days left in the trial period. |
| Payment method |
Displays the payment method used for the selected subscription, including any credit/debit card expiry dates.
NOTE: Only the subscription Owner can view and edit the payment method. Users who are not the Owner do not see this row. |
| Server | Displays the Exclaimer Azure Region connected to your Exclaimer subscription. |
| ID | Displays the unique subscription ID. |
| Secondary email address |
Displays, if added, a second email address that will receive copies of invoices. To edit or add an email address, select the
|
| Cancel this subscription |
Select the link to begin the cancellation process.
NOTE: Only the subscription Owner can cancel a subscription. Users who are not the Owner do not see this link. |
 pencil icon. Enter or edit the name in the text box, then select Save.