
Scenario
You have deployed the Exclaimer Outlook Add-in, and you notice that your signatures are not showing on Outlook desktop, but they are showing on Outlook Web without any issue.
Reason
The Exclaimer Outlook Add-in feature uses a connected service which is only available when the option for Optional connected experiences is enabled in Outlook.
Resolution
To resolve this issue:
Pre-requisites
Mailbox type:
- Microsoft 365 mailboxes only
Windows
- Outlook on Windows (Microsoft 365 Subscription) [version 2409 (Build 18025.20000)]
- Outlook on Windows (Retail Perpetual) [version 2501 (Build 18429.20132)]
- Outlook 2024 on Windows (Volume-licensed perpetual) [version 2408 (Build 17932.20222)]
- Microsoft Outlook Web Access
- Microsoft Windows 10, Windows Server 2016 or above
Mac
- Outlook on Mac [version 16.89 (24090815) or above]
NOTE: Only the New Outlook interface is supported. Go to Outlook > New Outlook to enable it.
Mobile:
- Android: Outlook version 4.2433.0 or above
- iOS: Outlook version 4.2433.0 or above
Microsoft 365 Plan
- Your Microsoft 365 plan must allow access to deploy Microsoft 365 Apps through Microsoft AppSource. Certain plans, such as Office 365 E2 do not support this.
For more information, see Microsoft's guide to using Add-Ins.
To enable the Optional connected experiences option in Outlook:
- Log in to the Outlook Desktop App.
- Select File from the ribbon bar.
- Select Options from the menu sidebar.
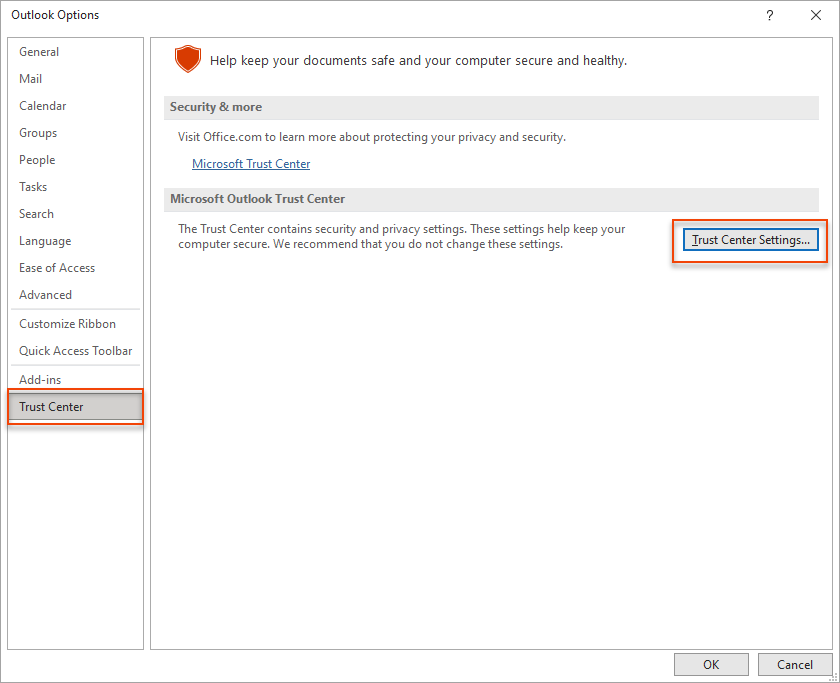
The Outlook Options window is displayed.
- Select Trust Center then select Trust Center Settings....
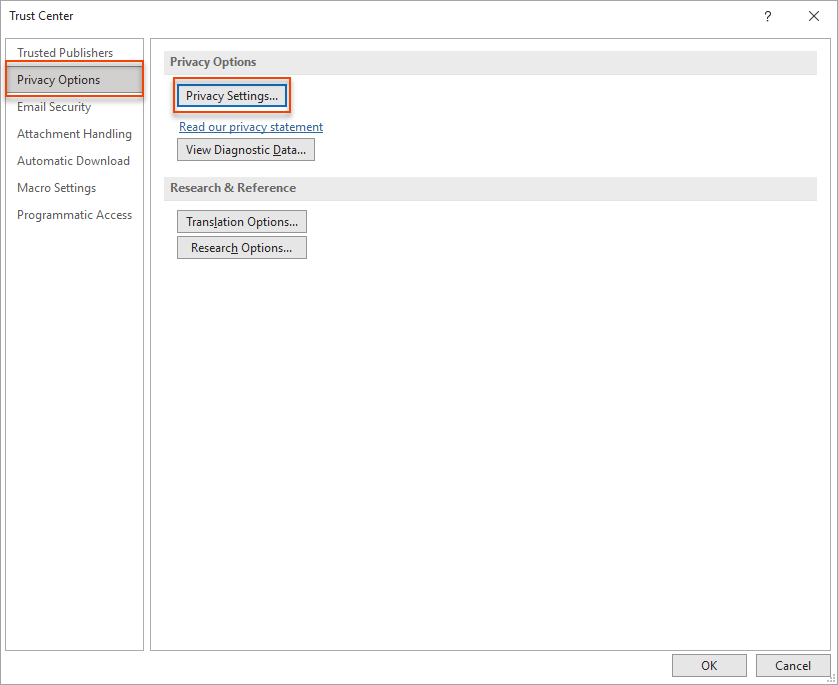
- Select Privacy Options, then select Privacy Settings...
- Check the Turn on optional connected experiences option.
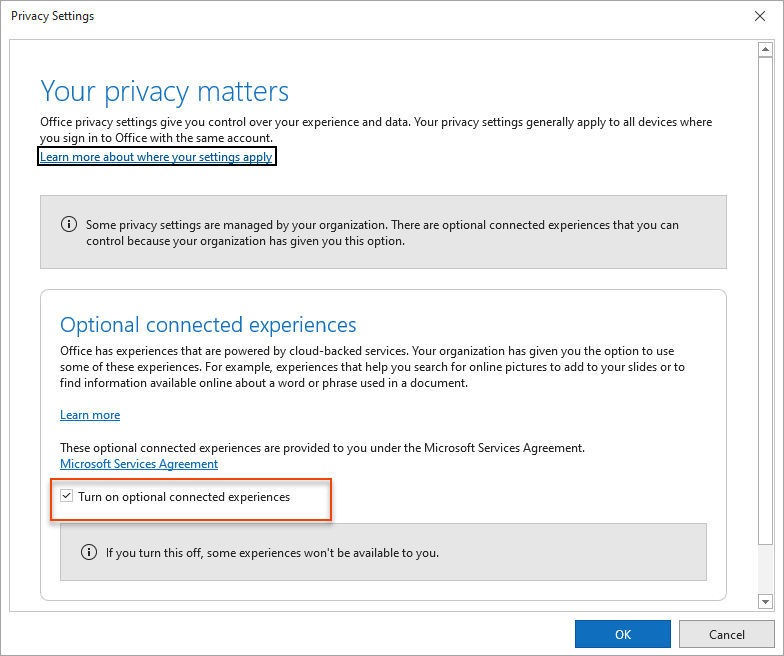
- Select OK to save the changes.
Run our diagnostic PowerShell script to help the Support team check your Outlook and Exclaimer Add-In setup. The script safely collects technical details, such as Outlook version, Add-In status, and connectivity without accessing personal data or emails, enabling faster troubleshooting.
To run the script:
- Launch Windows PowerShell. Administrator privileges are optional but recommended.
-
Copy and paste the following command into PowerShell:
Set-ExecutionPolicy -Scope Process -ExecutionPolicy Bypass; Invoke-WebRequest -Uri "https://raw.githubusercontent.com/exclaimerltd/Internal-Support-Scripts/master/AddInChecks.ps1" -OutFile "$env:TEMP\AddInChecks.ps1"; & "$env:TEMP\AddInChecks.ps1"
- Follow the on-screen prompts.
-
When complete, a report named AddInChecks.html will be generated.
NOTE: Report Location:
By default: C:\Users\<YourUser>\Downloads\AddInChecks.html
Fallback (if Downloads is unavailable): C:\Temp\AddInChecks.html
- Attach the generated file to your Support ticket to allow the Support team to review your configuration.
If your Support request concerns authentication, include an export of the affected user's Entra ID sign-in logs with your Support ticket.
To export the logs:
- Sign in to the Microsoft Entra admin centre.
- Navigate to Monitoring & health > Sign-in logs.
- On the Interactive sign-ins tab, filter by the affected user's UPN and the date range covering the issue, then export as CSV.
- Switch to the Non-interactive sign-ins tab, apply the same filter, and export as CSV.
- Attach both CSV files to your support ticket.