
Description
You have installed Exclaimer - Signatures for Microsoft 365, but some of your users still have manually-created signatures within Microsoft Outlook. You want to delete their existing Outlook signatures.
Resolution
There are multiple ways to delete users' existing signatures. You can delete signatures in New Outlook and Outlook on the Web (solution 1), Classic Outlook (solution 2), use the Exclaimer Signature Update Agent (if installed previously) to remove all existing signatures (solution 3), or use a PowerShell script for users on Entra-ID accounts (solution 4) or on-premises configuration (solution 5).
Select an option below to view the related instructions:
To delete signatures in New Outlook and OWA:
- Select the File menu, then select Settings.
- Select Accounts, then select Signatures.
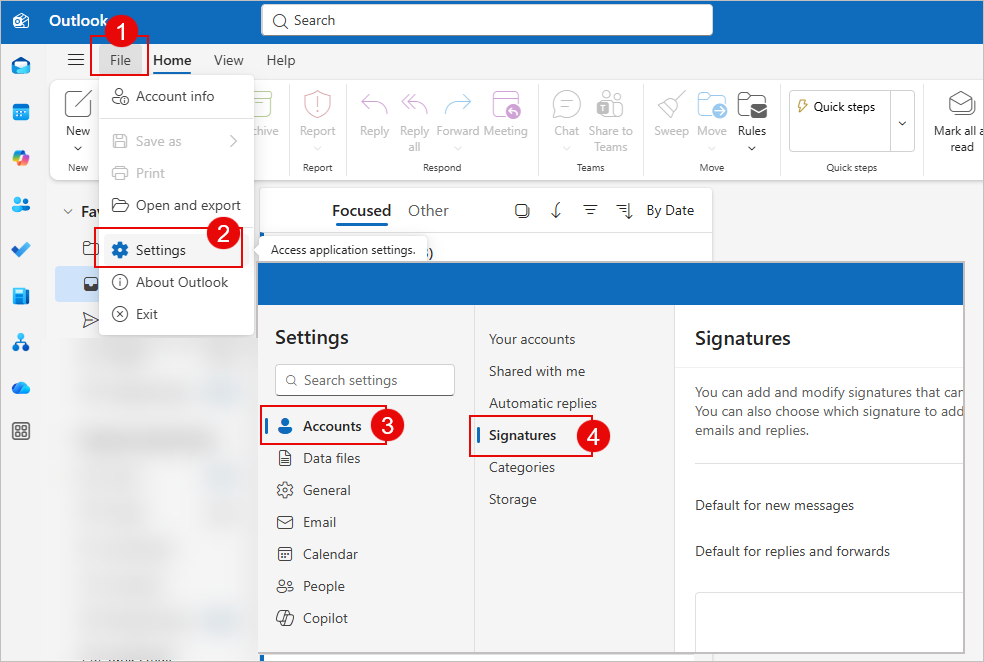
To delete signatures in New Outlook, select the File menu, select Settings, select Accounts, then select Signatures.
- If you have multiple accounts, select the account from the drop-down. The signatures for that account will appear below. To delete a signature, select the bin icon next to it.
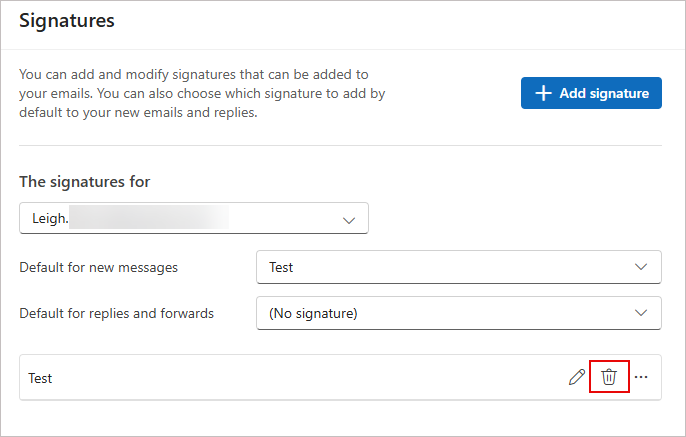
Select the bin icon next to the signature you wish to delete.
To delete signatures manually:
- In Outlook, open the File menu, then select Options from the menu pane.
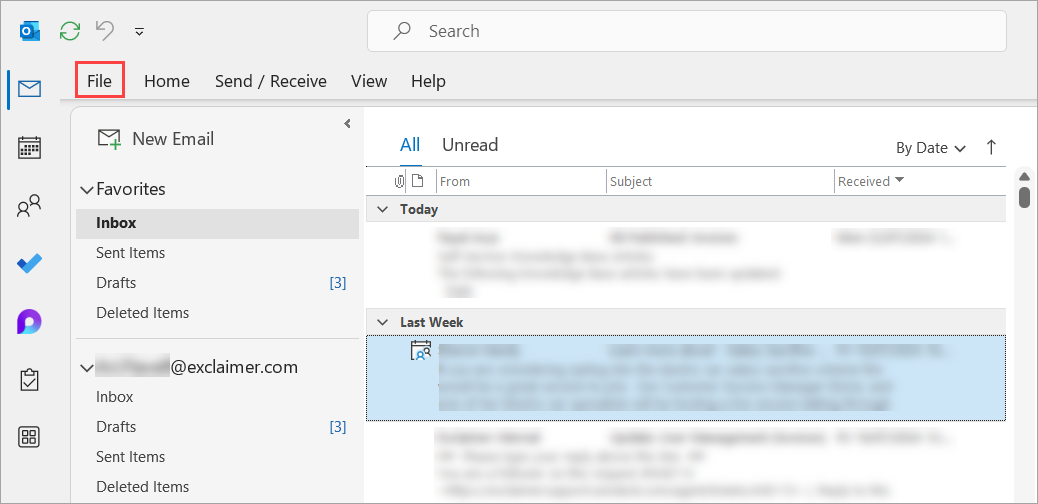
The File menu in Outlook.
- Select Mail, then select Signatures.

Select Mail from the menu sidebar, then Signatures from the Mail screen.
- Select a signature and select Delete.

Select a signature to delete, then select the Delete button.
- Select Yes to confirm.
This option is suitable for organizations that have enabled client-side signatures and installed the Exclaimer Signature Update Agent on the users' machines.
To use the Exclaimer Signature Update Agent to delete the signatures:
- Log into the Exclaimer portal.
- Select the cogwheel icon to open the Settings menu, then select Outlook Signatures.
- Locate the Options section and select the Remove all existing signatures in Outlook and Apple Mail checkbox. For more information, see Outlook Signatures - Options.
- Select Save.
All manually-created signatures will be removed from any machines where the Exclaimer Signature Update Agent is installed. This may take up to one hour.
To create and upload a script to back up and delete existing signatures via Intune:
-
Save the following text as a PowerShell file (.ps1). This makes a new script.
<#
.SYNOPSIS
Script to backup and then delete all signature files from the signatures folder used by Microsoft Outlook on Windows.
.DESCRIPTION
This script is designed to be deployed by Microsoft Endpoint Manager or by Group Policy to delete signature files from a machine for the logged in user.
.NOTES
Date: 23rd January 2023.
.PRODUCTS
Exclaimer - Signatures for Office 365.
.USAGE
Check that the variables $SignaturesFolder and $SignaturesBackupFolder are set to the best values for your organisation.
The backup of the signature files is optional and can be removed if desired.
#>
#Declaring Signatures folder location
$SignaturesFolder = "$env:APPDATA\Microsoft\Signatures"
#Declaring Signature backup folder location
$SignaturesBackupFolder = "$env:APPDATA\Microsoft\SignaturesBackup"
#Backup Existing signature files
If (! (Test-Path -path "$SignaturesBackupFolder")){
Copy-Item -Path "$SignaturesFolder" -Destination "$SignaturesBackupFolder" -Recurse
}
#Delete original signature files
Get-ChildItem -Path "$SignaturesFolder" -Include *.* -Recurse | foreach
{ $_.Delete()}
- Sign in to the Microsoft Endpoint Manager.
- Select Devices from the menu sidebar.
- Under Policy, select Scripts.
- Select Add. This opens the Add PowerShell script window.
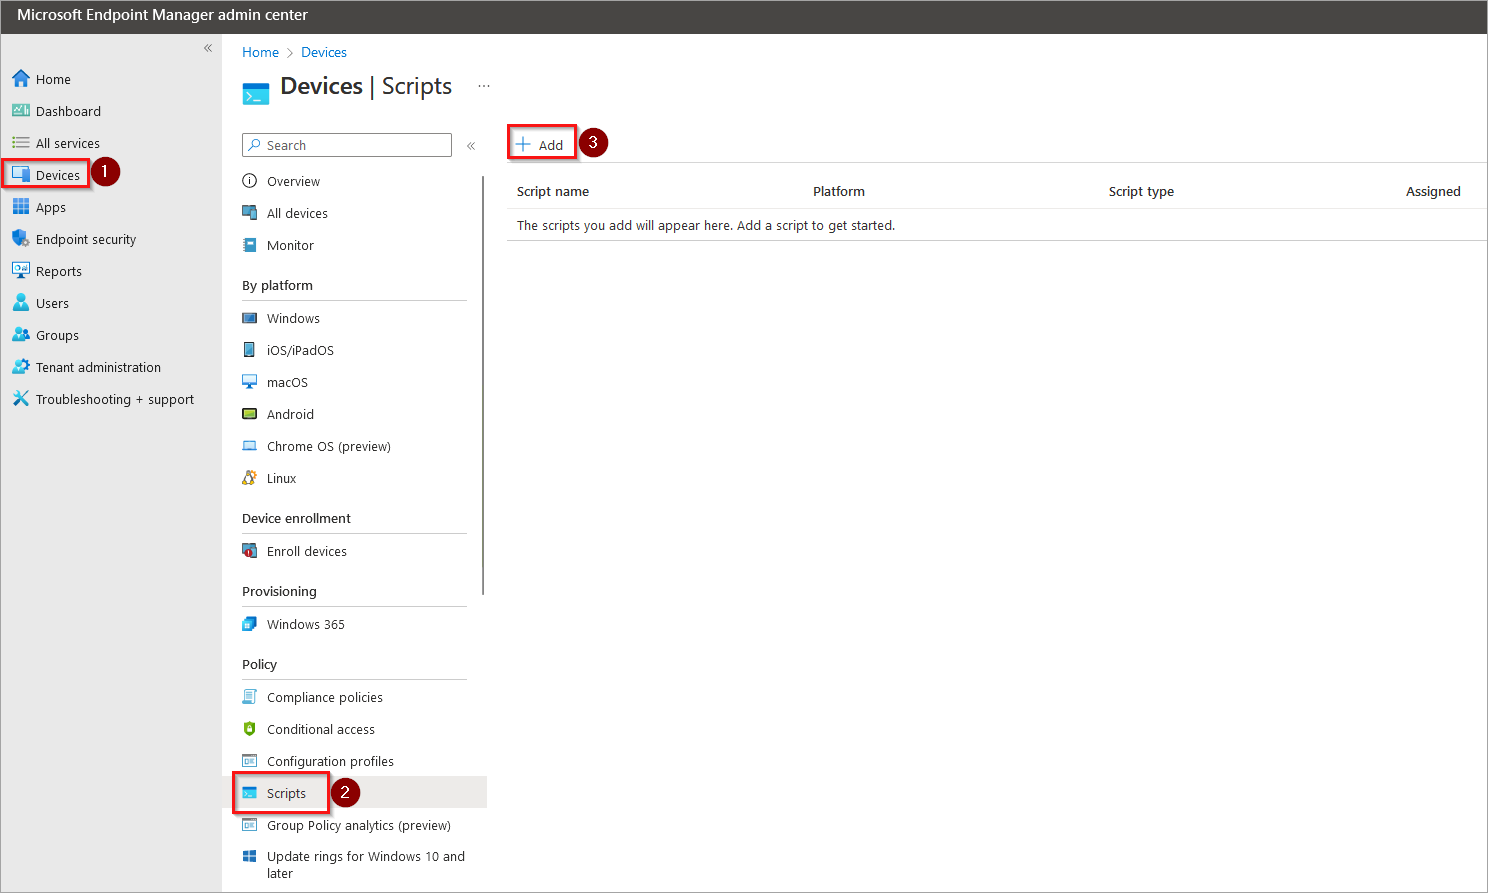
Select Devices, then from the Devices menu bar, select Scripts. Select Add from the Scripts screen.
- Select Windows 10 or later.
- Enter a name for the script, then select Next.
- In Script location, select the folder icon in the entry field. Locate the script file you saved in Step 1, then select Open.
- Set the Run this script using the logged-on credentials toggle to Yes.
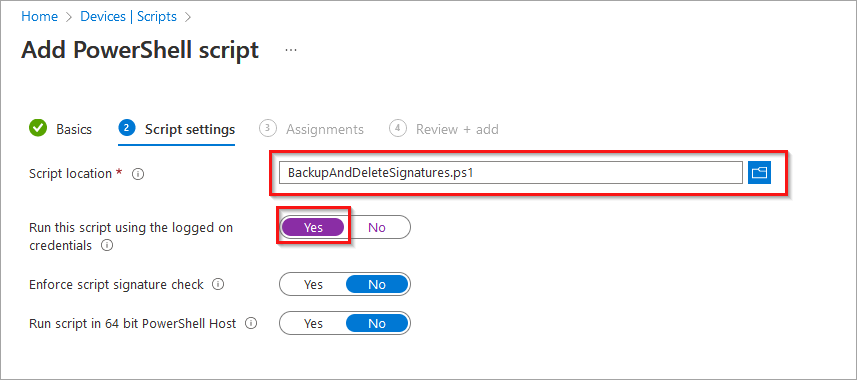
In the Script settings section, choose your file and set the toggle to Yes.
- Select Next.
- Choose which users you want to run the script for.
EITHER:
Select Add groups and specify a group of users.
OR
Select Add all users.
- Review the settings, then select Add. The script will run the next time the user logs into the machine.
This solution is for Classic Outlook only and will not work for New Outlook or OWA. This option is suitable for machines which are domain-joined (on-premises), and the user is signing in with their domain user account.
To save and run a script via GPO:
-
Save the following text as a PowerShell file (.ps1). This makes a new script.
<#
.SYNOPSIS
Script to backup and then delete all signature files from the signatures folder used by Microsoft Outlook on Windows.
.DESCRIPTION
This script is designed to be deployed by Microsoft Endpoint Manager or by Group Policy to delete signature files from a machine for the logged in user.
.NOTES
Date: 23rd January 2023.
.PRODUCTS
Exclaimer - Signatures for Office 365.
.USAGE
Check that the variables $SignaturesFolder and $SignaturesBackupFolder are set to the best values for your organisation.
The backup of the signature files is optional and can be removed if desired.
#>
#Declaring Signatures folder location
$SignaturesFolder = "$env:APPDATA\Microsoft\Signatures"
#Declaring Signature backup folder location
$SignaturesBackupFolder = "$env:APPDATA\Microsoft\SignaturesBackup"
#Backup Existing signature files
If (! (Test-Path -path "$SignaturesBackupFolder")){
Copy-Item -Path "$SignaturesFolder" -Destination "$SignaturesBackupFolder" -Recurse
}
#Delete original signature files
Get-ChildItem -Path "$SignaturesFolder" -Include *.* -Recurse | foreach { $_.Delete()}
- Press the Windows key and the R key together to open the Run command console.
- Enter gpedit or gpedit .msc to open the Group Policy Management console.
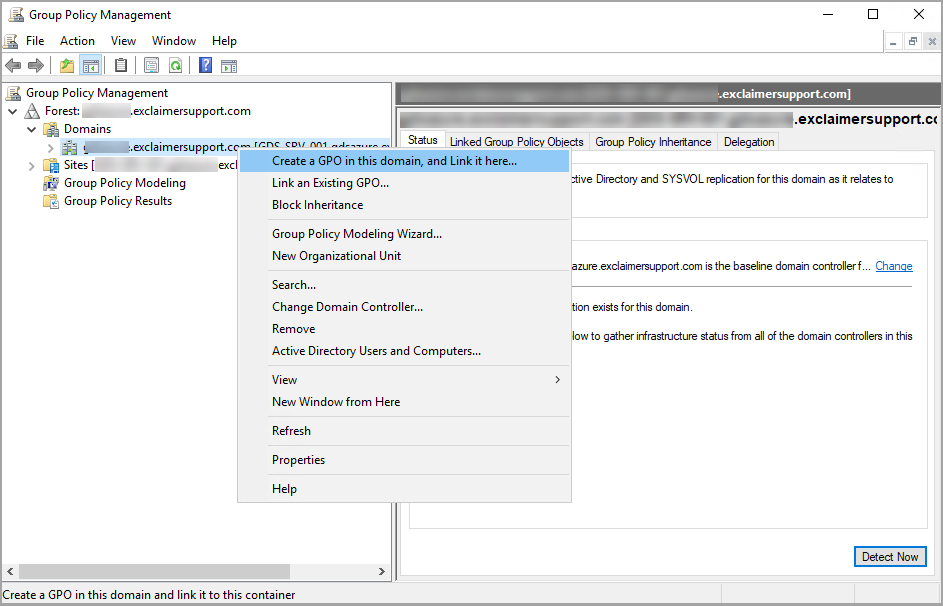
- Select your domain from the sidebar.
- Either open the Action menu and select Create a GPO in this domain > Link it here… or right-click the domain and select Create a GPO in this domain, and Link it here…
The Create a GPO option is in the right-click menu.
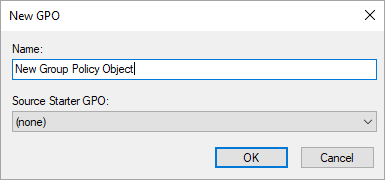
This opens the New GPO window.
- Enter a name for the new Group Policy Object (GPO) and select OK.
The New GPO window.
- Right-click the new GPO from the list and select Edit. This opens the Group Policy Management Editor.
- In the sidebar, expand User Configuration, then Policies, then Windows Settings.
- Select Scripts (Logon/Logoff).
- Double-click Logon. This opens the Logon Properties window.
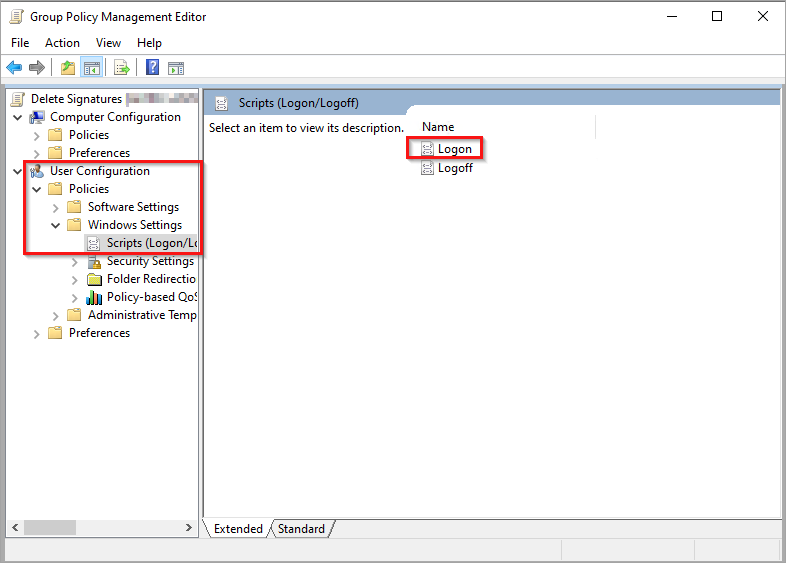
Open Scripts (Logon/Logoff) from the Windows Settings folder, then open Logon.
- Select the PowerShell Scripts tab, then select Add...
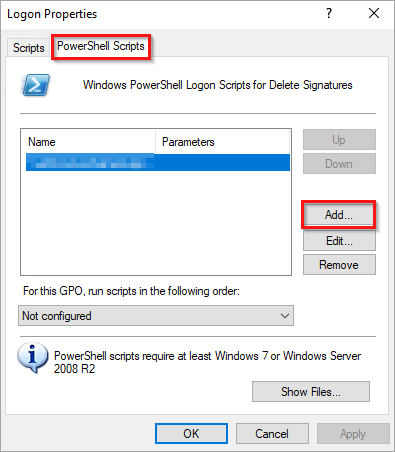
The Add button is found in the PowerShell Scripts tab.
- Select Browse... then locate and select the script file you saved in Step 1.
- Select OK. The script will run the next time the user logs into the machine.