
Scenario
When using Exclaimer with a third-party security solution (for example, Mimecast; Proofpoint; Barracuda; Reflexion and so on), you may find that emails do not route the way you would like them to or do not have a signature applied.
The following list of smart hosts or security solutions are known to work when using Exclaimer - Signatures for Microsoft 365:
- Fusemail (Exclaimer is known to work with Fusemail SecureSMART Suite, but cannot be used with Fusemail Hosted Exchange.)
- Proofpoint
- Symantec Cloud
- Mimecast
- Barracuda (see How to Configure Office 365 Outbound Automatic Replies. The setting Except if is an exception to the Transport rule that manages the Barracuda outbound connector.)
If your chosen Smart Host or email security service is not listed above, this does not mean that it cannot be used when using Exclaimer - Signatures for Microsoft 365.
Resolution
Sender > Microsoft 365 > Exclaimer > Microsoft 365 > third party security solution > Recipient.
In the example below, we are using Mimecast, but you can follow the same steps for other Smart Host or third-party security systems.
Currently, the connector is set to apply to all messages at the connector level and will likely appear similar to the following connector.
Example:
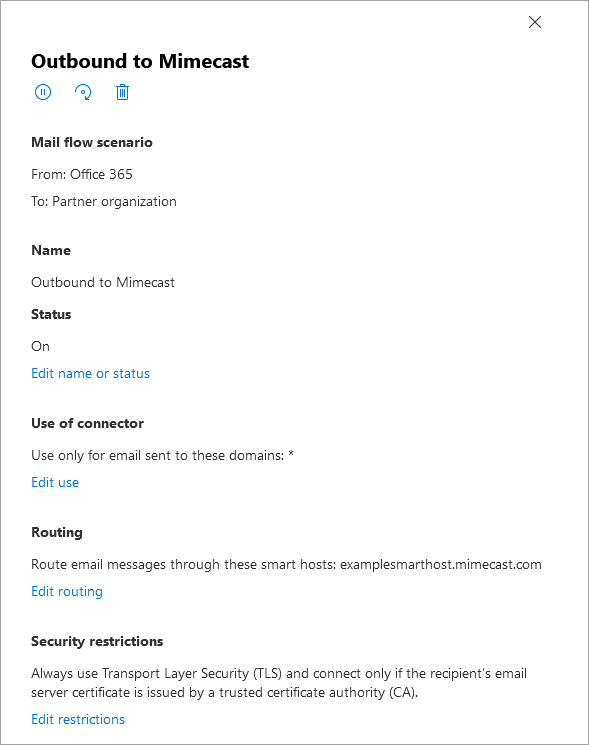
An example of a connector, in this case showing Mimecast.
The above setup shows the correct SMTP address for the Mimecast smart host, but this setup bypasses Microsoft 365 Transport Rules.
The objective of this solution is to modify the connector set up so that it uses a Transport Rule with a lower priority than the Exclaimer Transport Rule; therefore, ensuring that signatures are applied before messages are scanned by the third-party security solution.
Please follow the steps below to reconfigure your connector:
- Log on to the Exchange admin center as a Global Administrator.
- Select Mail flow, then select Connectors.

Select Connectors. - Select the outbound connector.
- Within the Use of connector section, click Edit use.
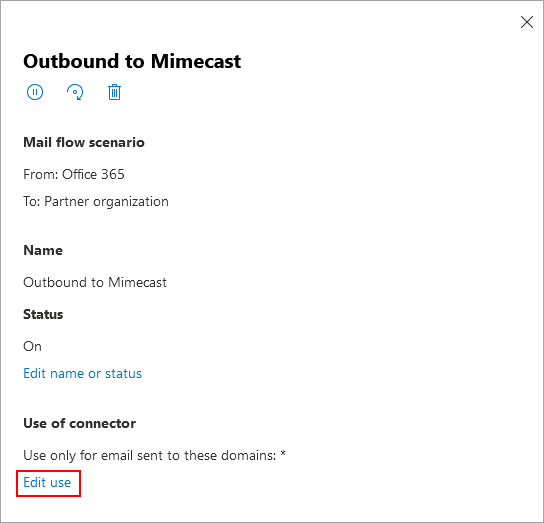
Select Edit use.
- Select Only when I have a transport rule set up that redirects messages to this connector.
- Click Next.
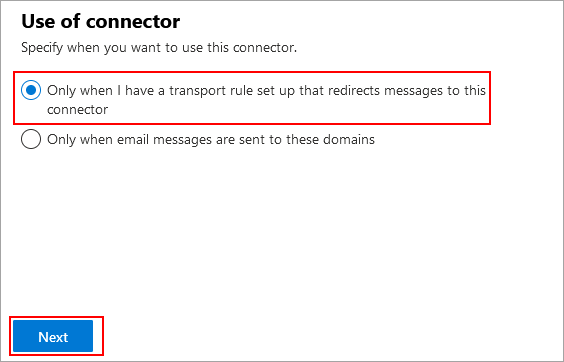
Select Next.
- If required, enter an email address.
- Click Validate.
Wait for the validation process to complete.
- Once completed, click Save.
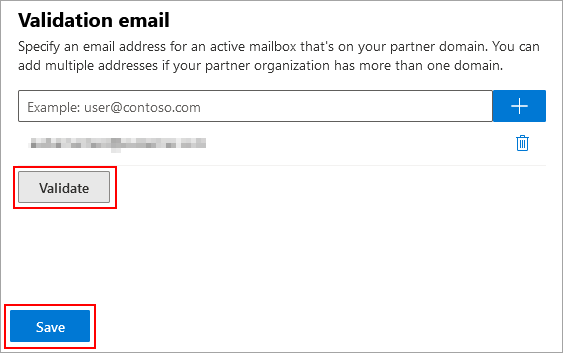
Select Save.
- In the admin center, under mail flow, select rules.
- Click the + (plus) button to add a new rule.
Example: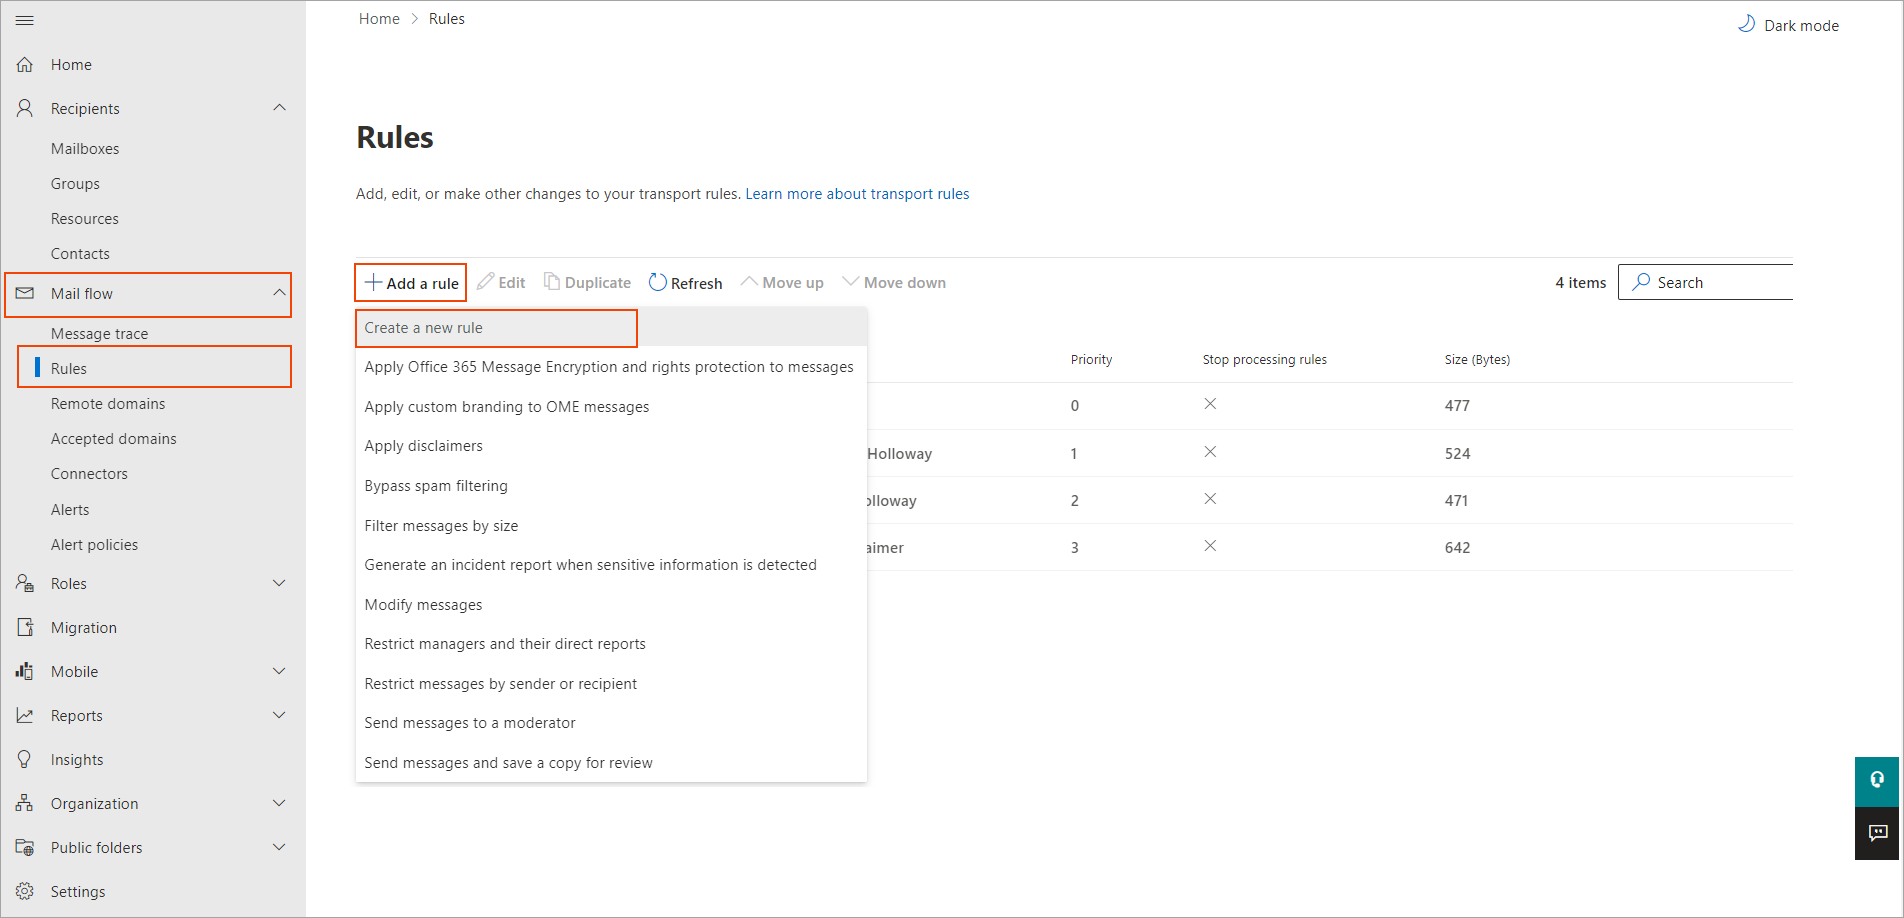
Select the plus to add a rule.
- Give the rule a name; example: Send to Mimecast.
Example: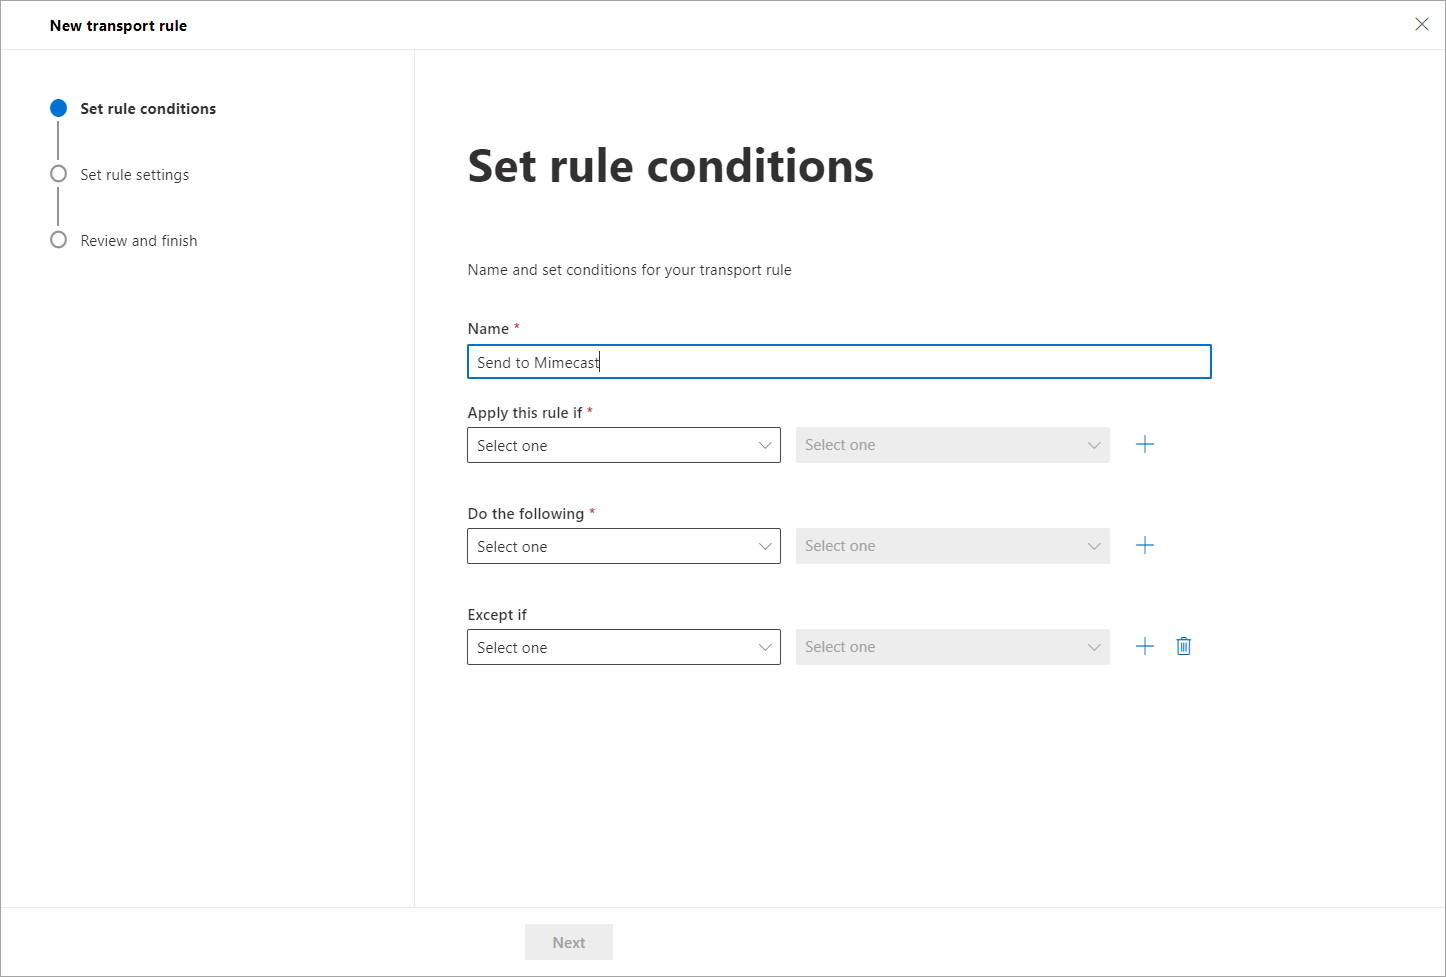
Name your rule.
- From the Apply this rule if drop-down list, select The sender. From the adjacent drop-down list, select is external/internal.
Example: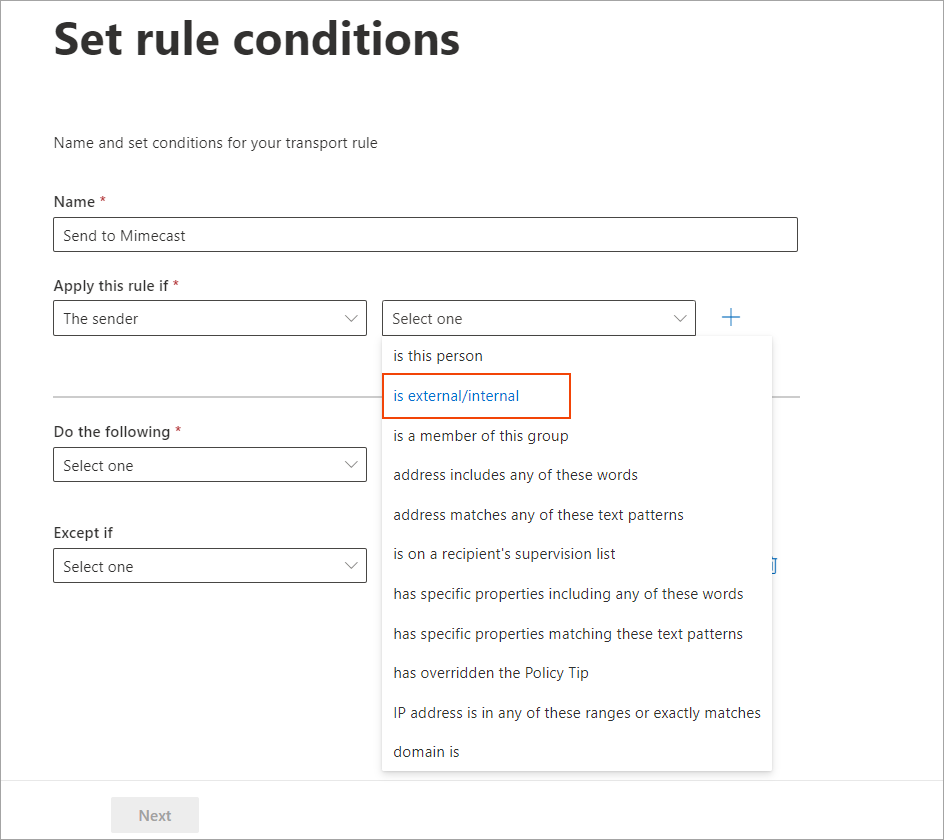
Select the appropriate options from the drop-downs.
- From the select sender location drop-down list, select Inside the organization. This will ensure that all emails sent from your Microsoft 365 tenancy are routed through the connector.
Example: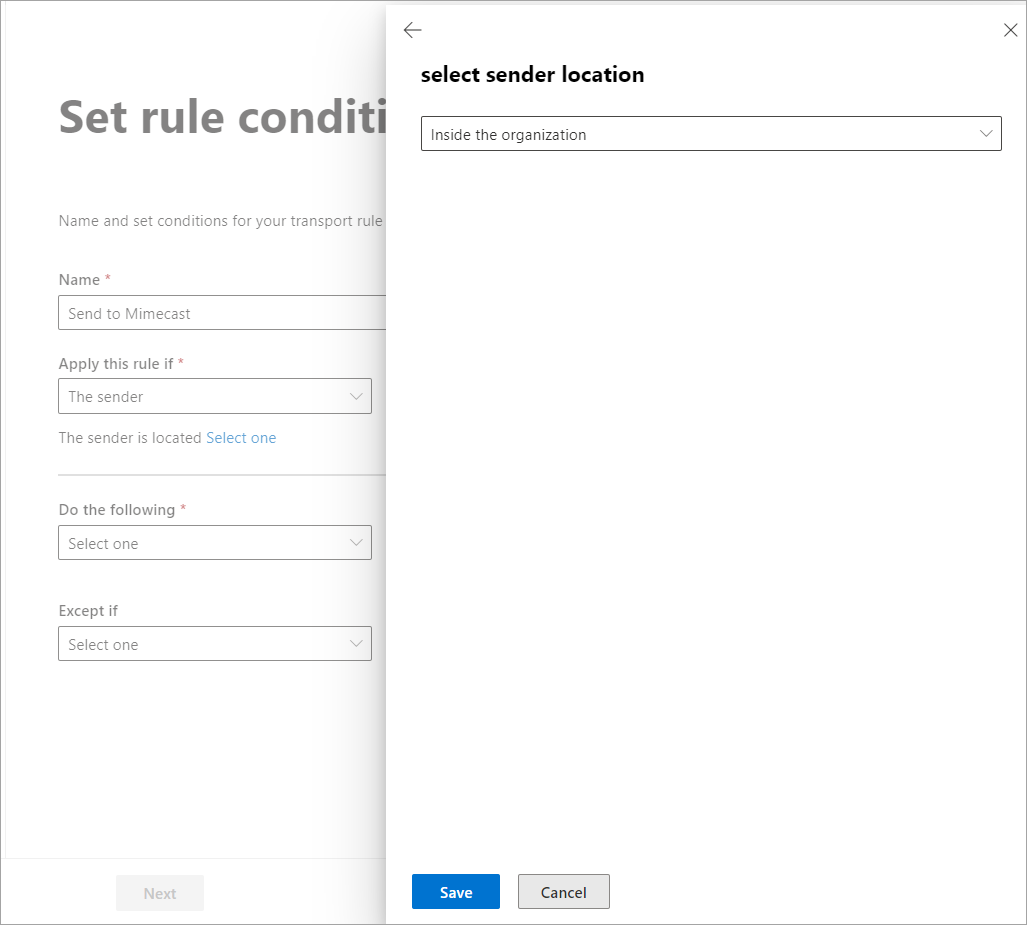
Select Inside the organization.
- Click Save to save the changes made.
The changes are reflected in the Set rule conditions window.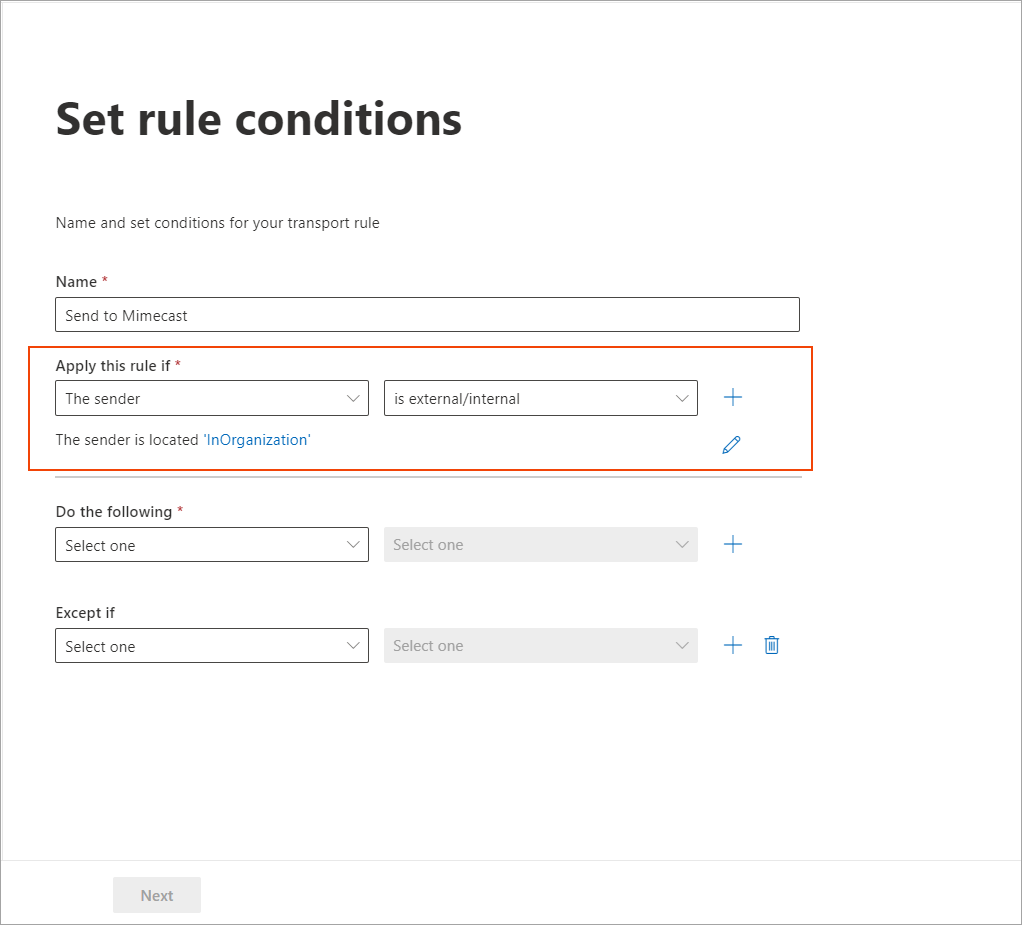
The Set rule conditions window.
- Click + (Add condition) to add another condition.
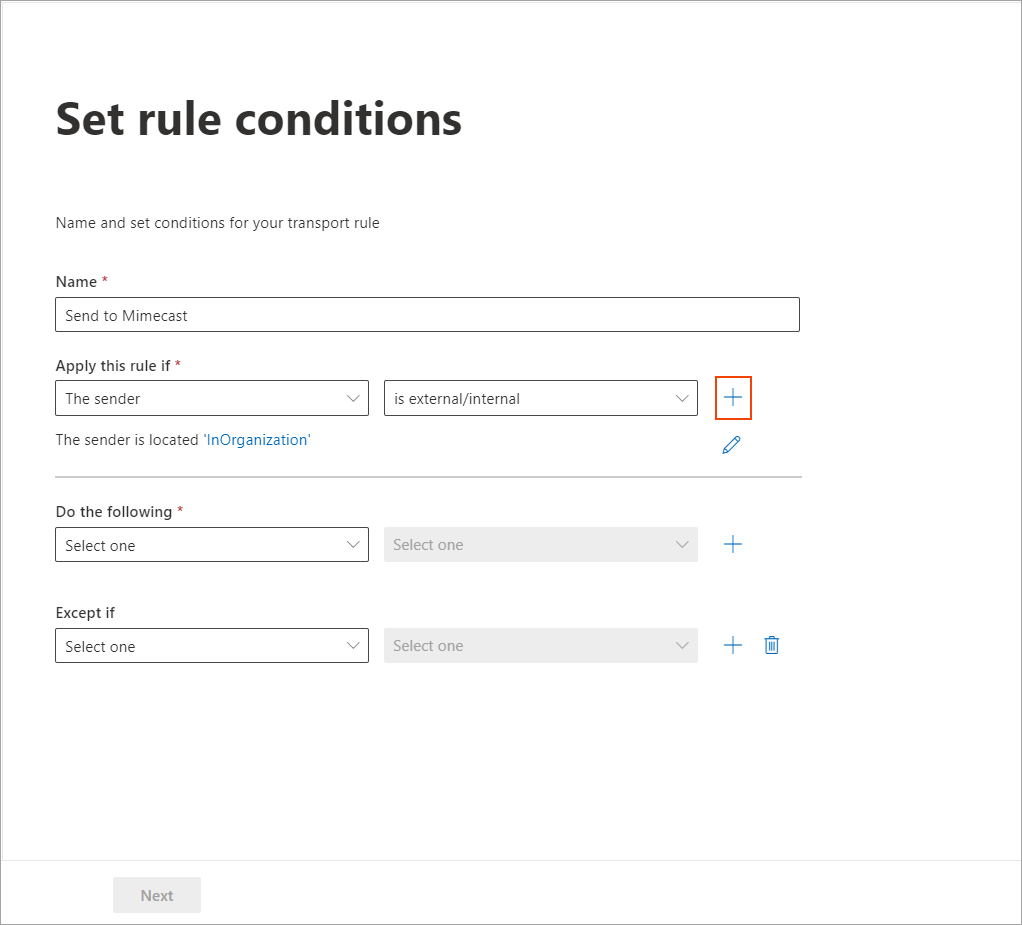
Select the plus to add another condition.
- From the And drop-down list, select The recipient. From the adjacent drop-down list, select is external/internal. From the select recipient location drop-down list, select Outside the organization.
This will ensure that your internal emails sent from your Microsoft 365 tenancy are not routed through the connector and prevent mail loops.
- Click Save to save the changes made.
The changes are reflected in the Set rule conditions window.
The Set rule conditions window.
- Now, from the Do the following drop-down list, select an action that states Redirect the message to.
- From the adjacent drop-down list, select and select the following connector.
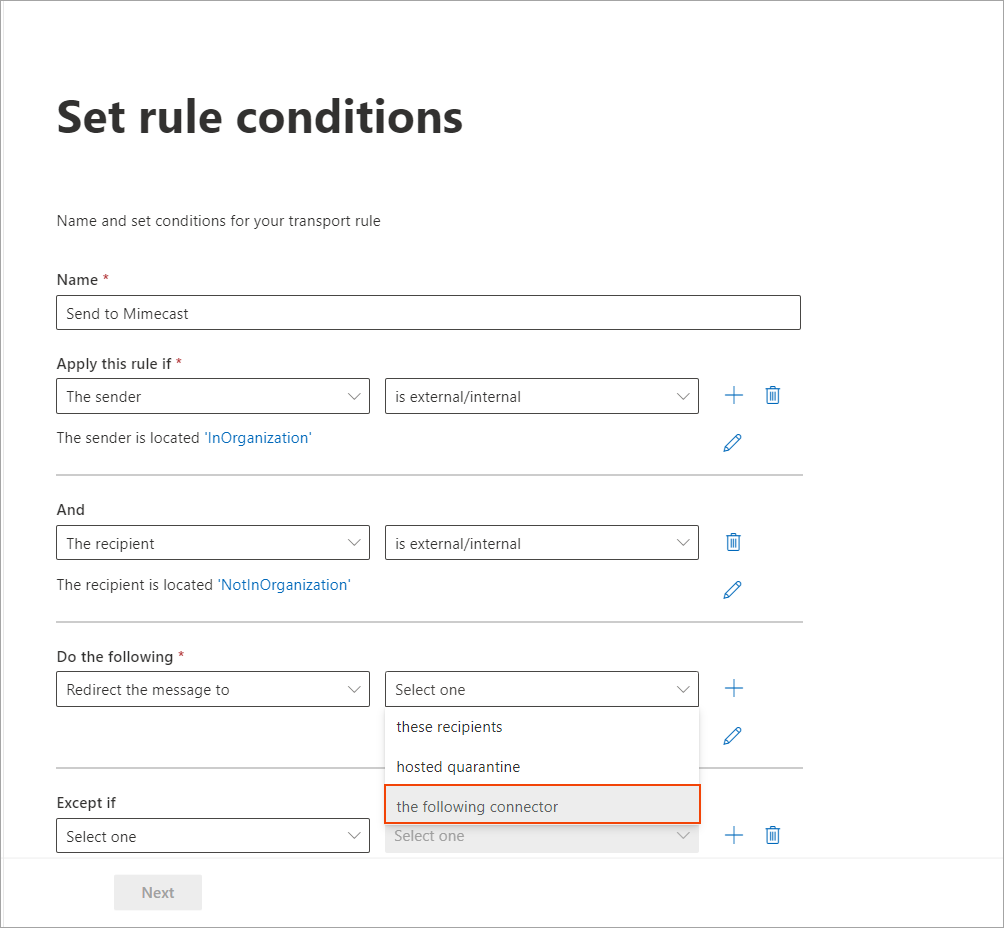
Select the appropriate options from the drop-downs.
- From the select connector drop-down list, select your third-party Security connector.
- Click Next.
- The next step, Set rule settings is enabled.
Tick the Activate this rule on option and select a suitable time to activate the rule.
Example: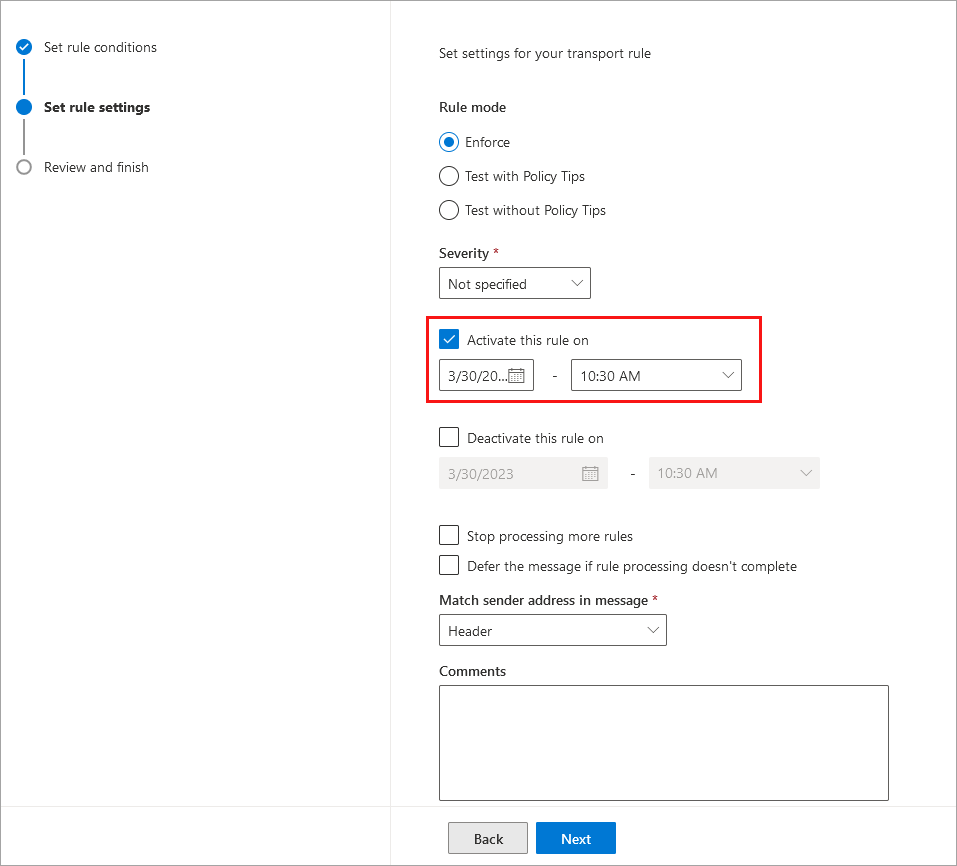
Select the checkbox and set a time.
- Click Next.
- Click Finish. The new mail flow rule will be displayed in the rules list with the lowest priority (the greater the number, the lower the priority).
You will also see an Exclaimer rule called Identify messages to send to Exclaimer Cloud - this rule usually has a priority of 1.
Example: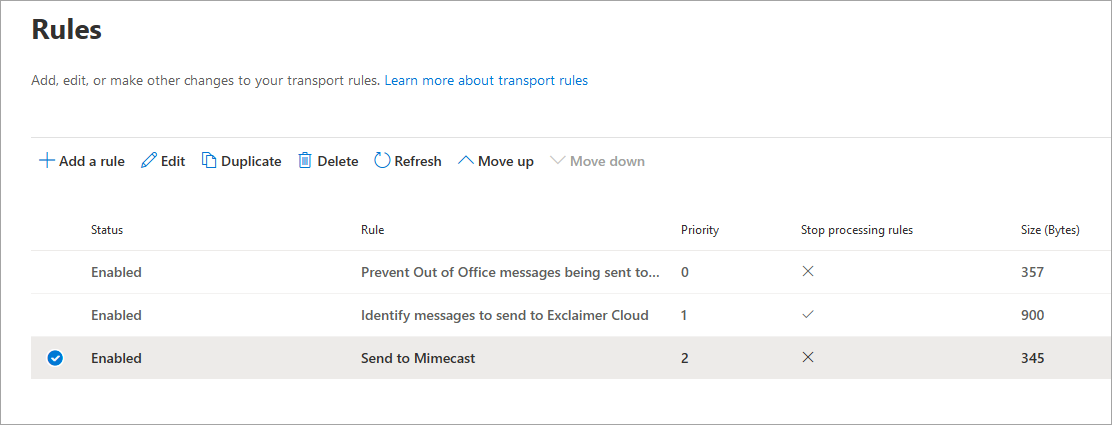
The rules in the list.
- In the rules list, please ensure there is a tick against the Identify messages to send to Exclaimer Cloud rule for Stop processing rules.
Example: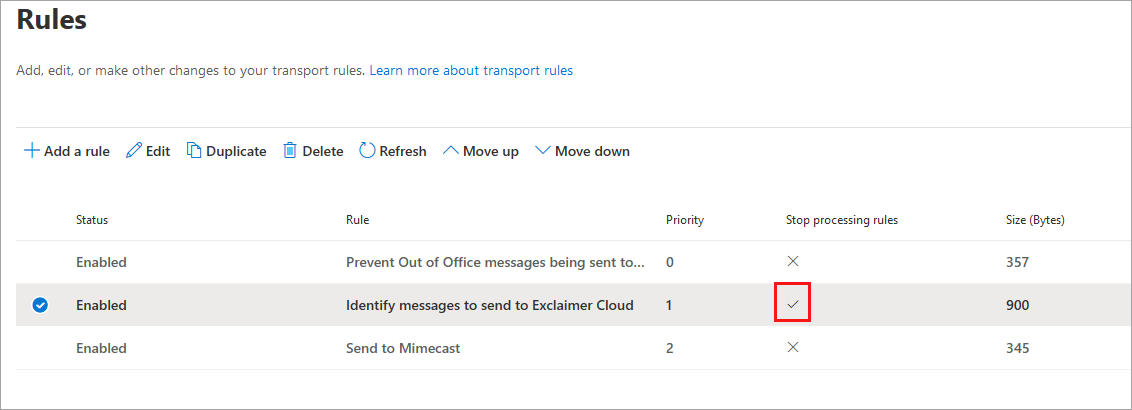
Ensure the rule has a tick next to it.
- If it is not ticked, select the Identify messages to send to Exclaimer Cloud rule.
The Identify messages to send to Exclaimer Cloud rule is displayed on the right-hand pane.
- Click Edit Rule conditions.
- Click Settings.
- Tick the Stop processing more rules option.
- Click Save.
Example: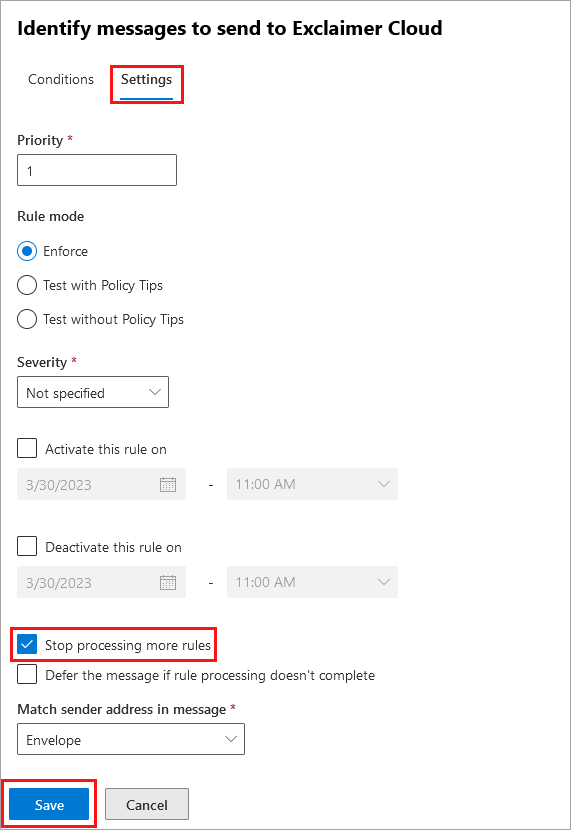
Ensure the correct options are selected.
The final step of this process is to return to the Exclaimer portal to ensure emails are routed to Microsoft 365 once the signature has been applied:
- Log into the Exclaimer portal (portal.exclaimer.com) and Launch your subscription.
- Select the cogwheel icon in the header bar to open the Settings menu, then select Mail Flow.
- In the right-hand pane, under Mail Routing Domain, are the relevant options.
In Domain Name, enter the .omnicrosoft.com domain name - this can be located in the Domain list in the Microsoft 365 Admin Center. This setting is important, and an incorrect domain can result in mail flow issues.
Example:
Enter the domain.
-
In the unsaved changes banner, select Save.
Your setup is now complete.NOTES: The MX record for the Domain name (in the Mail Routing settings) should specify a single Exchange Online Server for your Microsoft 365 tenancy.
- To check the MX record for your own Domain name, use a DNS lookup tool, such as MXToolbox.
Example showing Exclaimer's domain: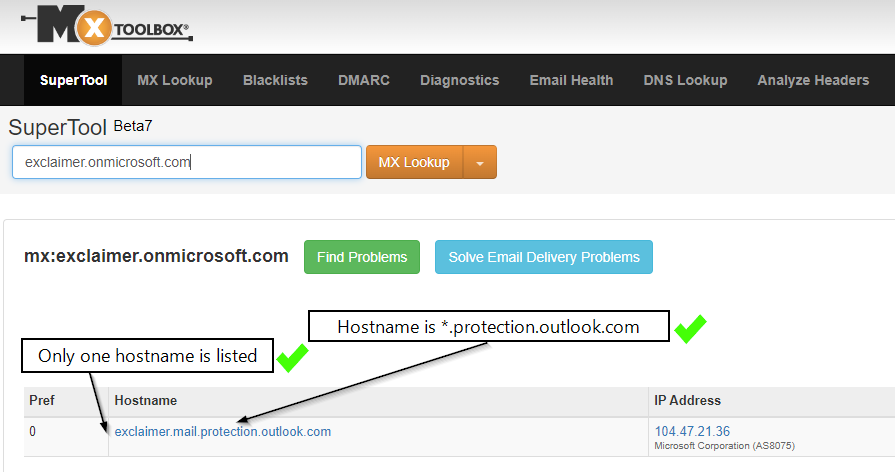
An example showing Exclaimer's domain.
Your setup is now complete. When you send a test email, you will be able to see (from the message headers) that the email routes from Microsoft 365 to Exclaimer, then from Exclaimer back to Microsoft 365 and from Microsoft 365 to Mimecast - as expected.