
Description
Many customers use Workday as their primary source of employee data rather than Active Directory or Google Directory. As part of Sender Management, Exclaimer’s HRIS integration synchronizes employee data directly from Workday, improving accuracy, reducing manual updates, and ensuring consistency across signatures.
This integration is available for Exclaimer subscriptions using Microsoft 365 and Google Workspace.
Set up Workday for Exclaimer integration (Workday)
Follow the steps below to configure Workday before connecting it to Exclaimer:
• You must have Workday Admin access to complete these steps. Use your organization’s unique Workday URL to log in.
• Plan the integration setup in your HRIS system in advance.
To create an Integration System User in Workday:
-
Navigate to Workday.
NOTE: You must have Admin access to Workday. Workday URLs vary by organization, so use your company’s specific login link. If you do not have access or are unsure how to proceed, contact your Workday Administrator. -
In the search bar, enter Create Integration System User.
The Create Integration System User window is displayed.
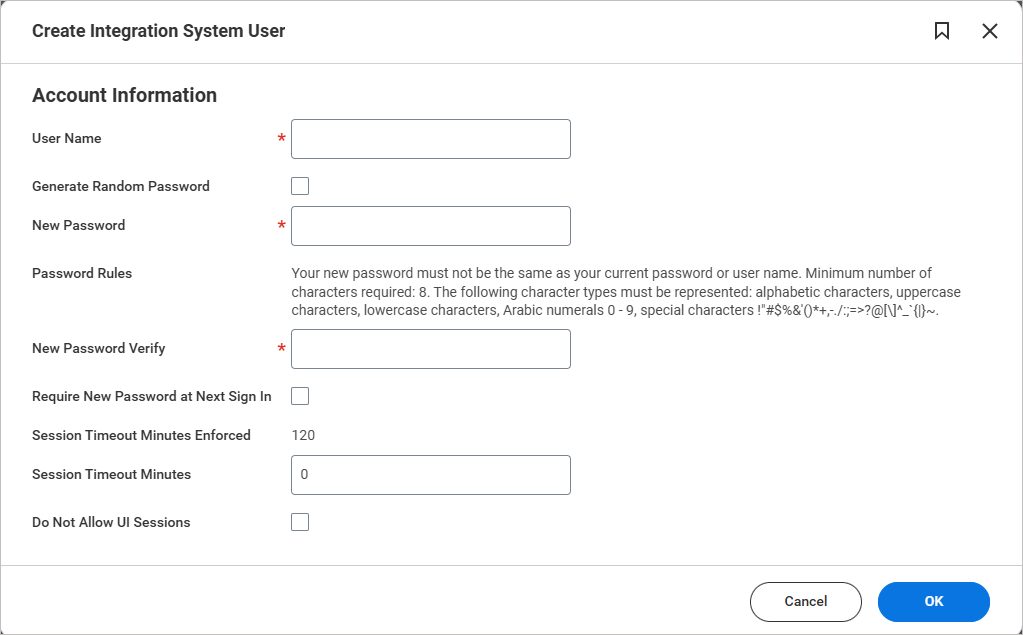
The Create Integration System User window.
- In User Name, enter a unique user name.
-
In Password, enter a password.
NOTE:
Your new password cannot be the same as your current password or your username.
• It must contain at least 8 characters.
• The password must include a mix of the following character types:
• Alphabetic characters (letters)
• Uppercase letters (A–Z)
• Lowercase letters (a–z)
• Numbers (0–9)
• Special characters such as: !"#$%&'()*+,-./:;=>?@[\]^_{|}~` -
Leave all other fields blank.
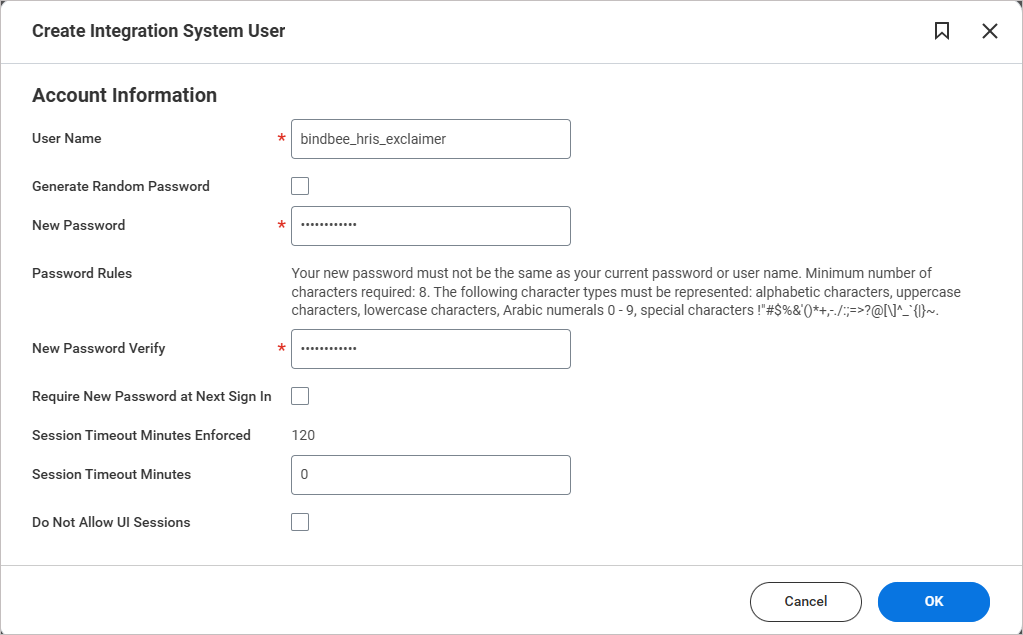
Example image of the Create Integration System User window. Enter the user name and password. Leave all other fields blank.
- Select OK.
-
Review the new system user. Select Done.
TIP! Record these credentials securely. They will be required for the integration.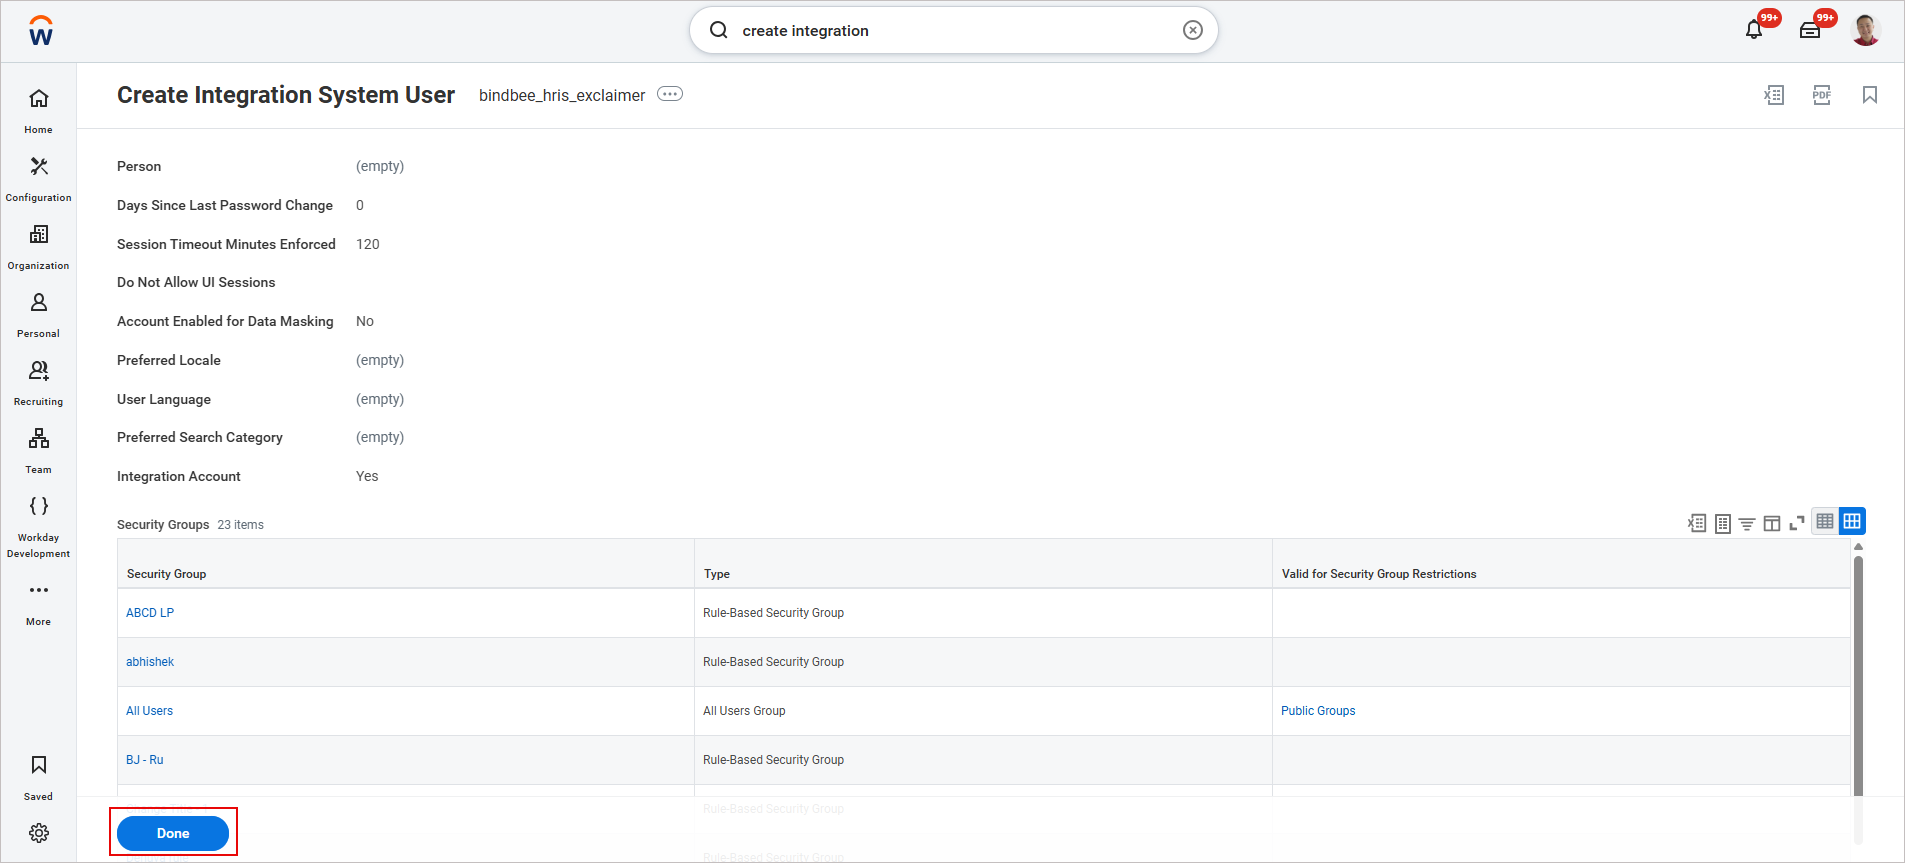
Example image of the Create Integration System User window. Review the new system user you created, then select Done.
Accounts used by system users and integrations are typically configured with non-expiring passwords and should be limited to security administrators.
To prevent the password from expiring:
- In the search bar, enter Maintain Password Rules.
The Maintain Password Rules window is displayed.
-
In System Users exempt from password expiration, add the Integration System User you created.
To add the Integration System User you created earlier:
- Select the note menu icon.
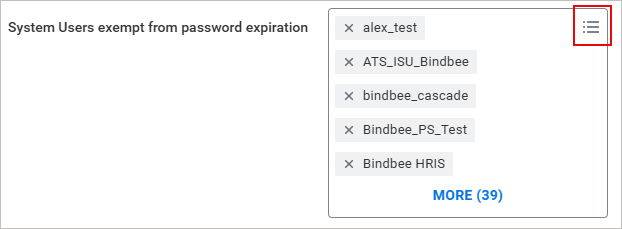
To add an Integration system user, select the three horizontal lines.
-
The Search text entry field is displayed. Enter the name of the new system user and press [Enter].
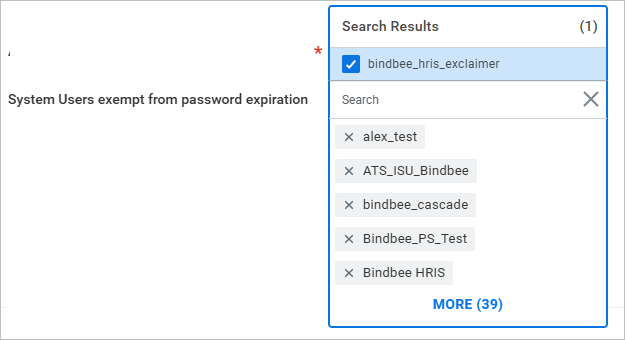
In the search entry field, enter the name of the new system user.
The user added will now appear in the list.
- Select the note menu icon.
- Select OK, then select Done.
To create a new security group:
- In the search bar, enter Create Security Group.
The Create Security Group window is displayed.
- From the Type of Tenanted Security Group drop-down, select Integration System Security Group (Unconstrained).
-
In Name, enter a name for the new security group.
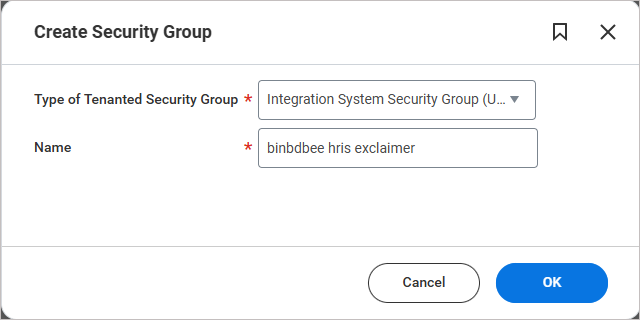
Example image of the Create Security Group window.
TIP! You can use any name, but for consistency, it is recommended to match the Integration System User name. - Select OK.
The Edit Integration System Security Group (Unconstrained) window is displayed.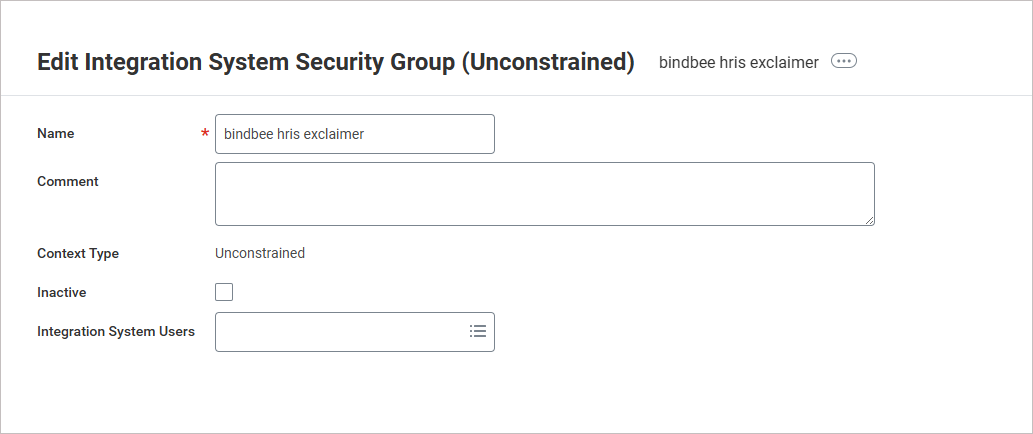
Example image of the Edit Integration System Security Group (Unconstrained) window.
- In Integration System Users, add the new Integration System User you created earlier.
- Select OK, then select Done.
To configure authentication policies:
- In the search bar, enter Manage Authentication Policies.
The Manage Authentication Policies window is displayed.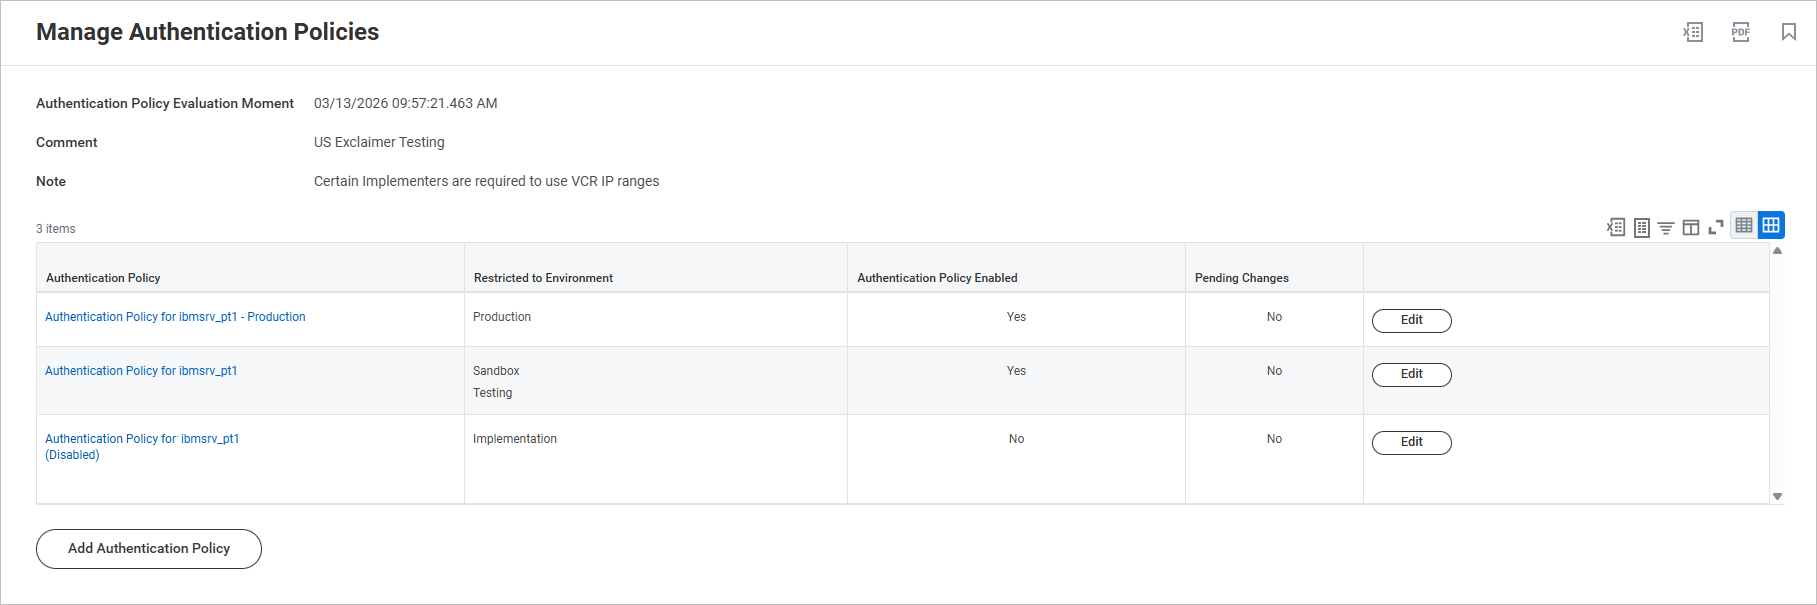
Example image of the Manage Authentication Policies window.
- Select Edit next to the policy you wish to edit.
- Select the + icon to add a new rule.
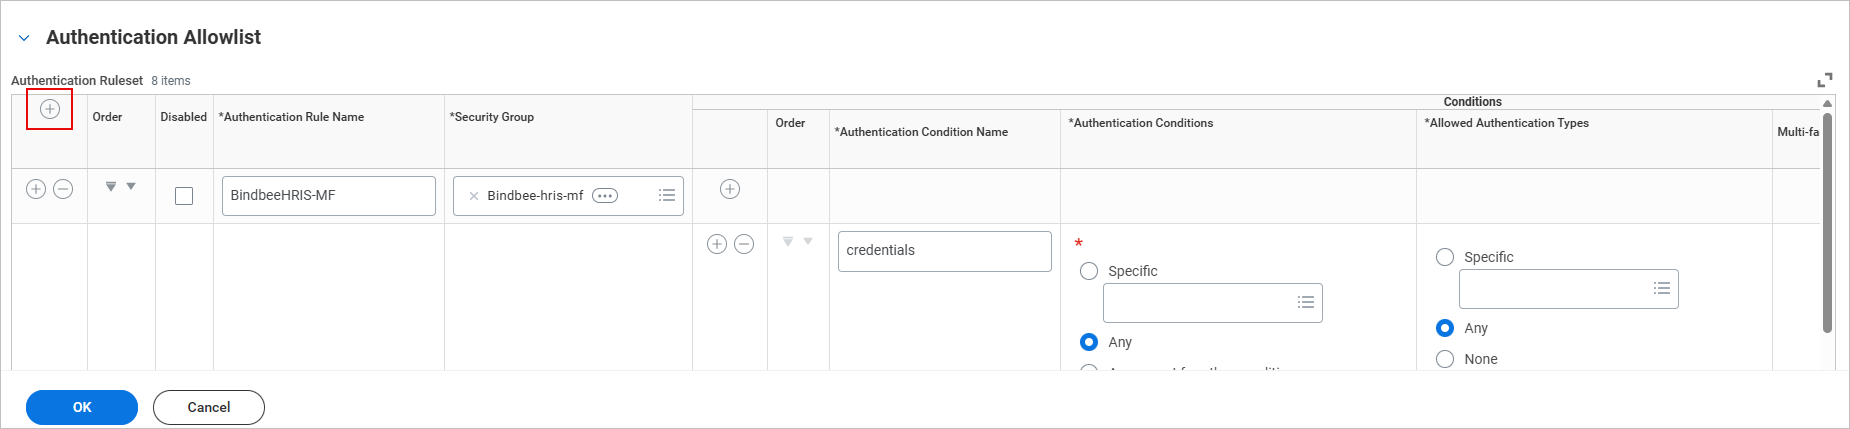
Example image showing the + icon to add a new rule.
A blank ruleset row is inserted in the table.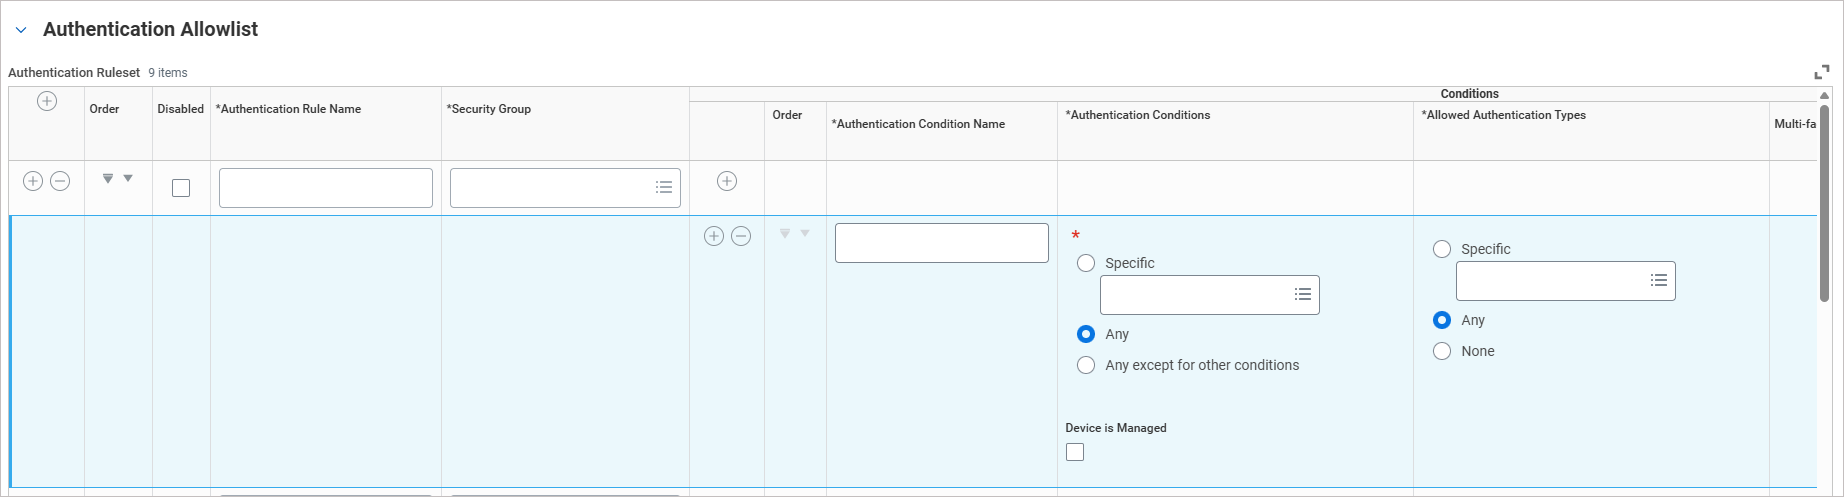
Example image showing that a blank new rule row is inserted.
- In Authentication Rule name, enter Bindbee HRIS.
- From the Security Group drop-down, select the security group you created.
-
In Authentication Condition Name, enter credentials.
NOTE: You can use any case when you enter 'credentials', there are no restrictions.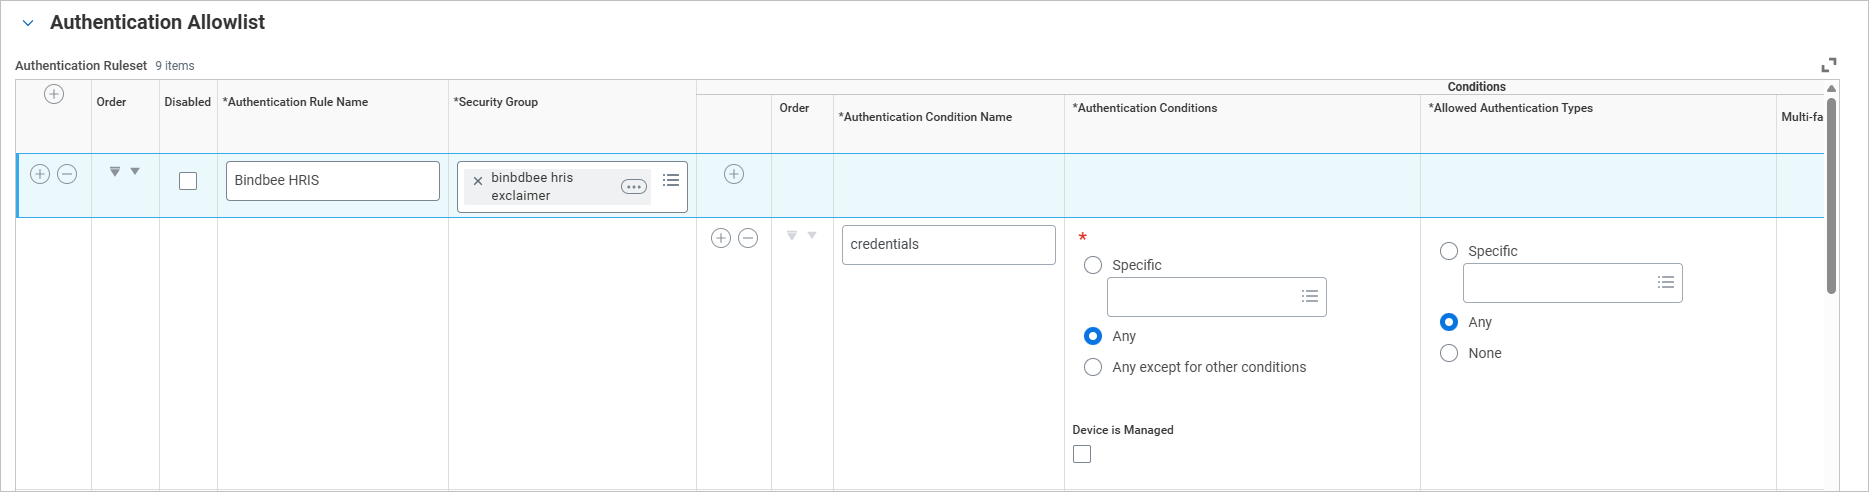
Example image showing policy details added. - Leave all other fields unchanged.
- Select OK, then select Done.
- Select Activate All Authentication Policies.

Example image showing the option to Activate All Authentication Policies.
- In Comment, enter a comment describing the change.
For example: "Exclaimer integration: activated authentication policy for Bindbee HRIS."
- Select OK.
- Select the Confirm checkbox to proceed with the authentication changes.
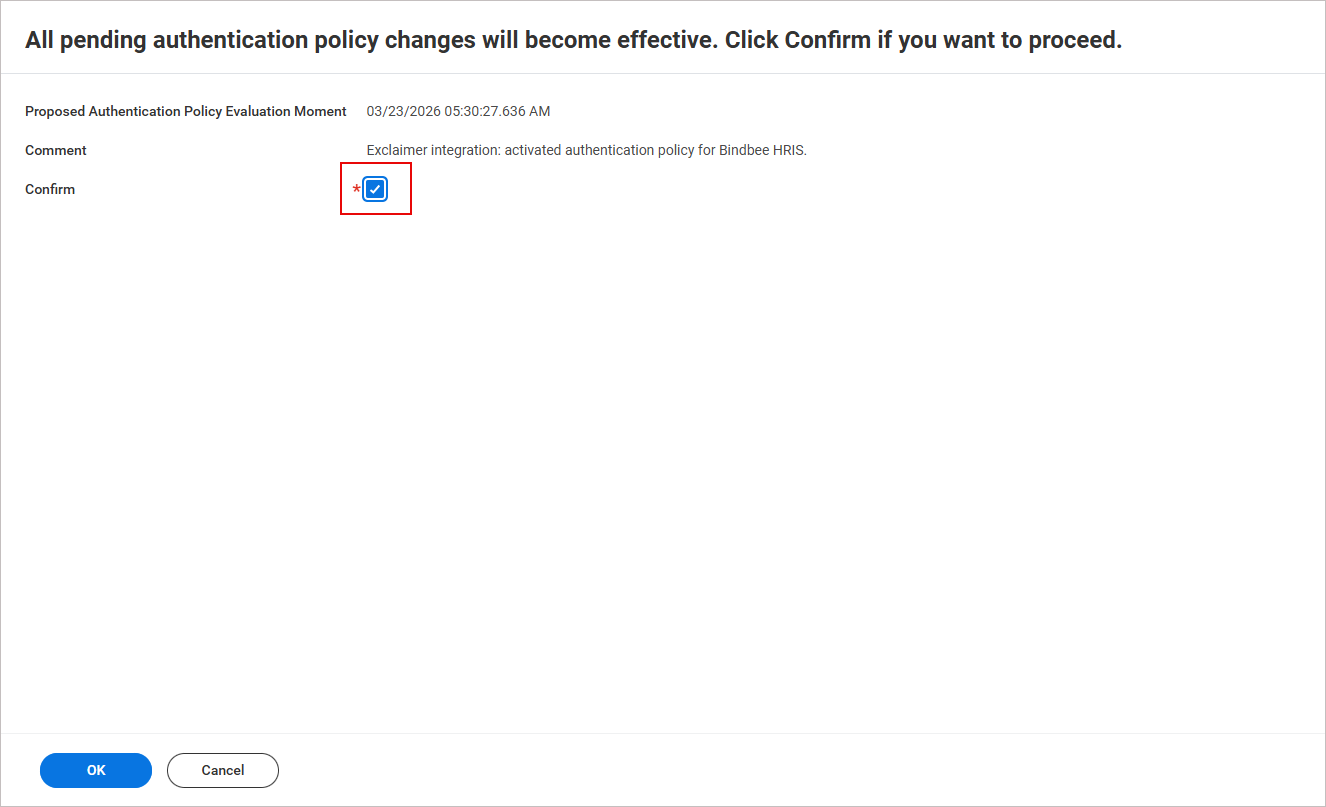
Example image showing the Confirm check box option.
- Select OK, then select Done.
To configure security group permissions:
- In the search bar, enter Maintain Permissions for Security Group.
The Maintain Permissions for Security Group window is displayed.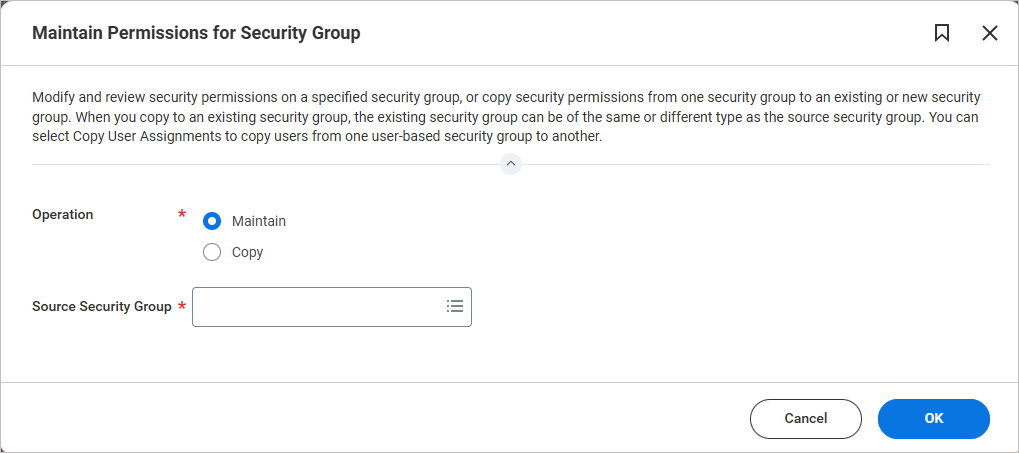
Example image showing the Maintain Permissions for Security Group window.
- In Source Security Group, enter the name of the security group you created.
- Select OK.
- Select the + icon to add a blank row of permissions.
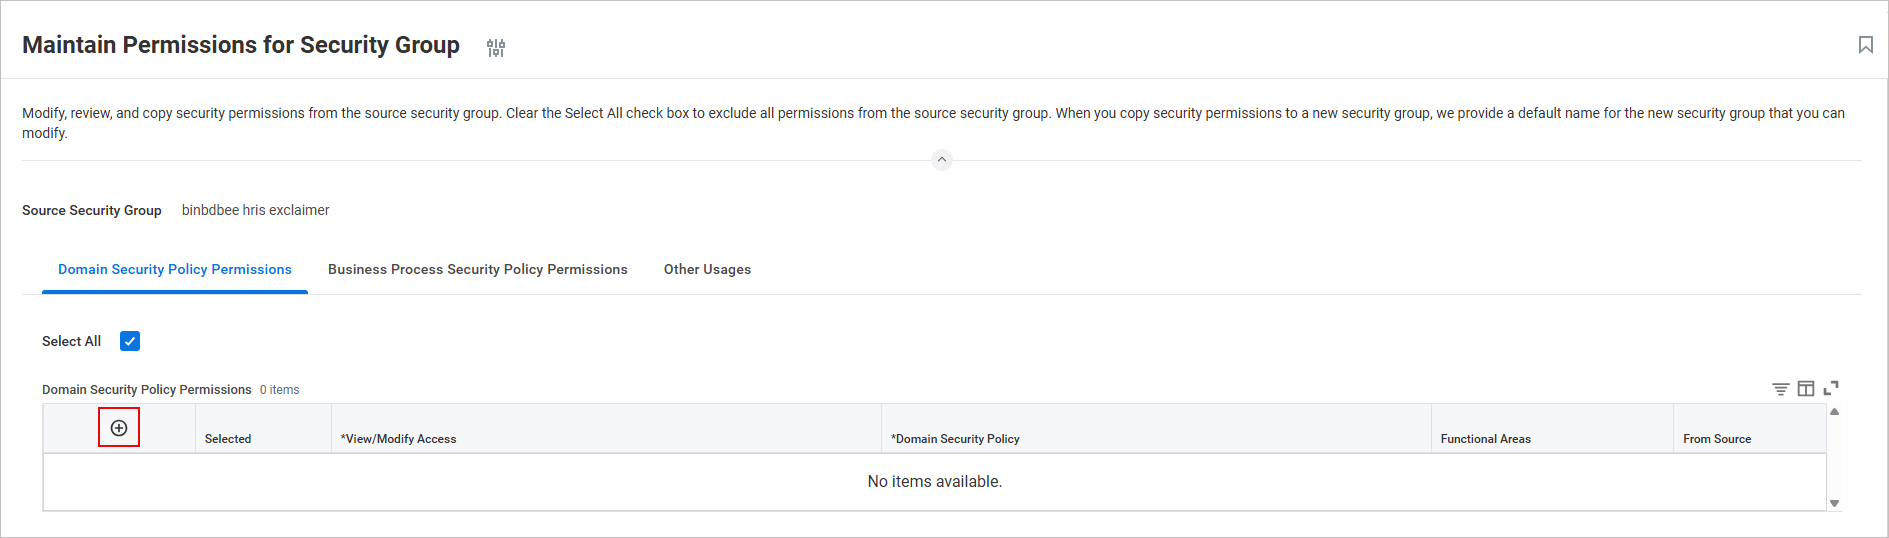
Example image showing the + icon to add a blank row of permissions.
A blank Security policy permission row is inserted in the table.
-
Configure the permissions required for Exclaimer to retrieve employee data from your Workday tenant. Exclaimer only retrieves the employee data required to populate and assign email signatures and does not access other sensitive information.
Add a new row for each permission.
The following table shows the recommended minimum set of Get Only (read-only) permissions:TIP! Copy and paste the permission names directly to search for and add them in Workday. Once you paste the entry, press [Enter].View/Modify Access
Domain Security Policy
Functional Areas
Get Only Worker Data: Public Worker Reports Staffing Get Only Worker Data: Current Staffing Information Staffing Get Only Person Data: Contact Information Contact Information Get Only Worker Data: Organization Information Staffing Get Only Person Data: Name Contact Information Get Only Worker Data: Workers Staffing Get Only Manage: Organization Integration Organizations and Roles NOTE:
• You only need to fill in the View/Modify Access and Domain Security Policy columns. After you have entered all permissions, select OK, the Functional Areas column will populate automatically.
Example image showing one row of the View/Modify Access and Domain Security Policy columns. Fill in the remaining permissions and select OK.
• If you need custom attributes, you will need additional permissions. Contact the Support team for more information. - Select OK, then select Done.
To activate security policy changes:
- In the search bar, enter Activate Pending Security Policy Changes.
The Activate Pending Security Policy Changes window is displayed.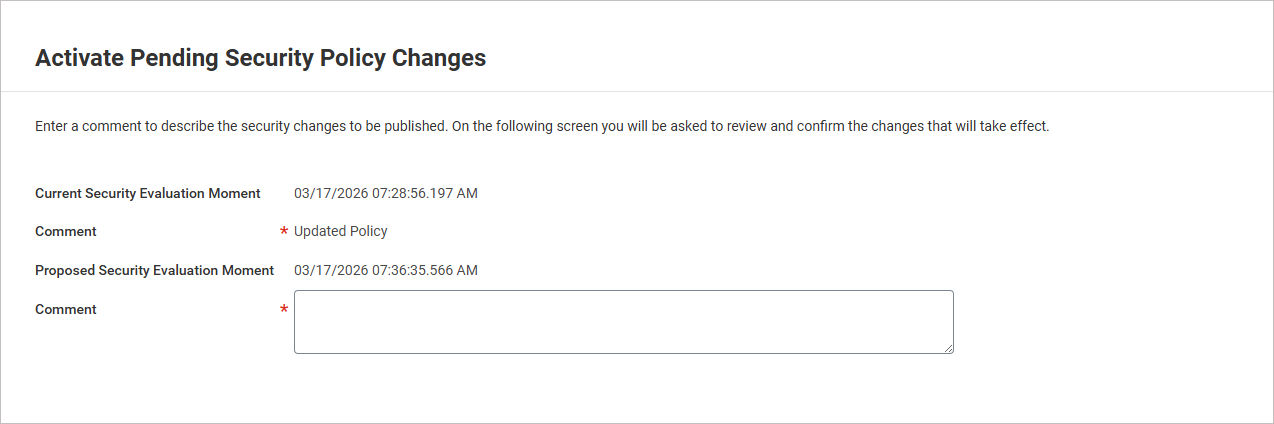
Example image of the Activate Pending Security Policy Changes window.
- In Comment, enter a comment describing the changes.
For example: "Exclaimer integration: updated security policy"
- Select OK.
- Select the Confirm checkbox to confirm all security policy changes.
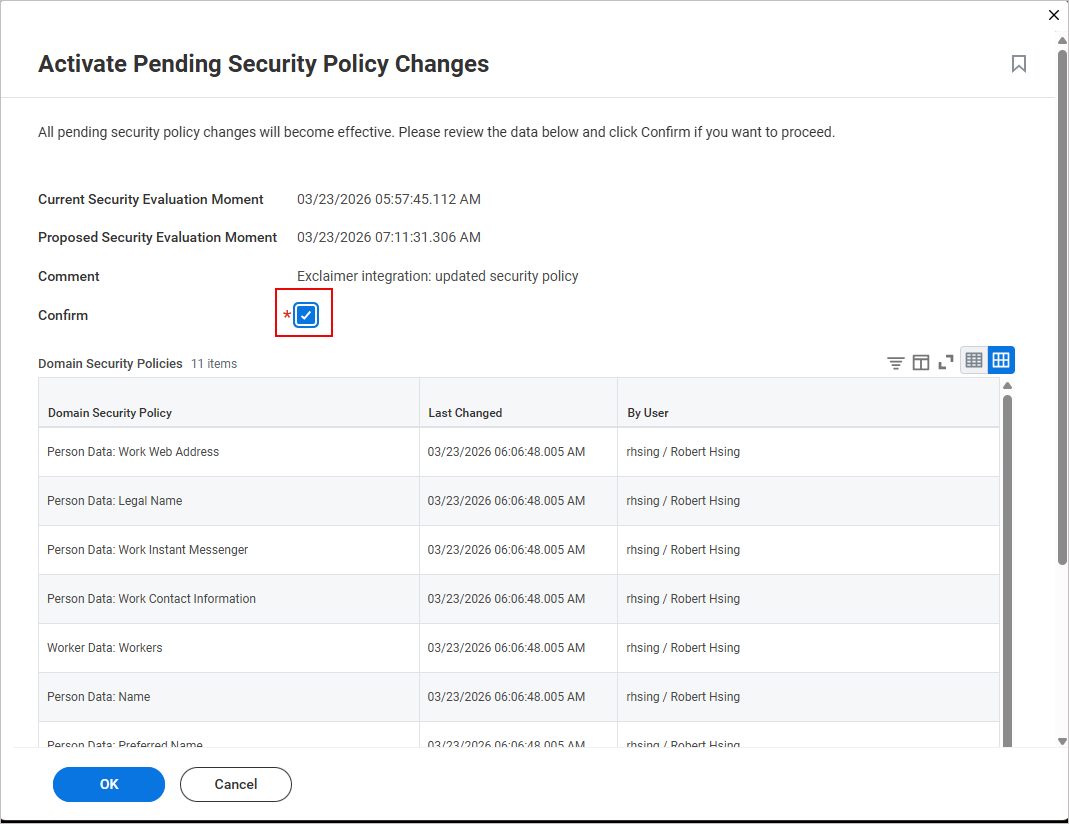
Example image showing the Confirm check box option.
- Select OK.
Access the Workday integration in Exclaimer
To access the Workday integration:
- From the header bar, select the cogwheel icon, then select Sender Management.
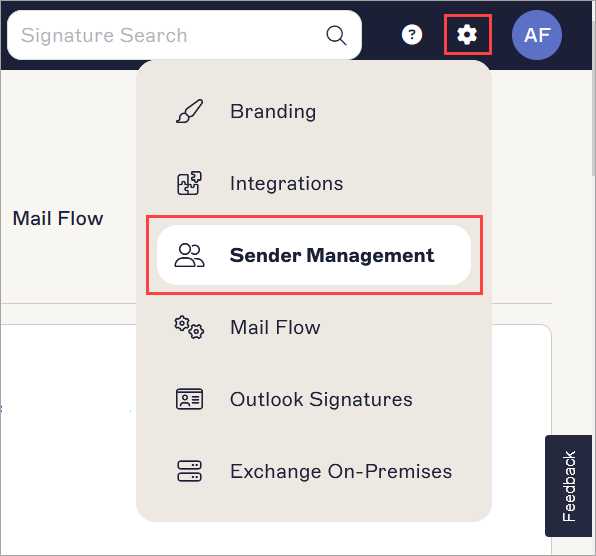
The example image is for a Microsoft 365 subscription and shows the Settings menu.
- Navigate to the Enable HRIS access section.
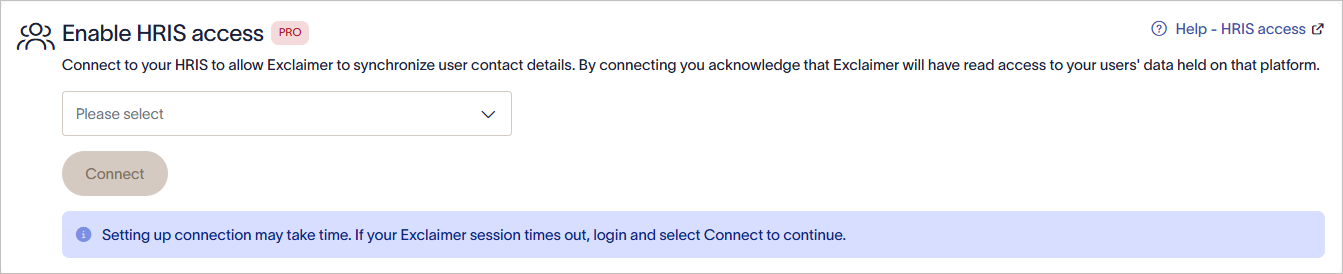
The Enable HRIS access section.
Connect Exclaimer to Workday (Exclaimer)
Follow the steps below to connect Exclaimer to Workday:
• Use an Exclaimer Pro subscription
• Allow the required Bindbee domains in your network. These domains must load in the browser for the connection window to work:
• cdn.bindbee.dev
• *.bindbee.dev to cover additional subdomains used during the connection flow (for example, API callbacks and authentication redirects)
• Have the following Workday details ready:
• Integration System User credentials
• Web Services Endpoint URL
• Workday tenant name
Follow the steps in the connection window:
- From the drop-down list, select Workday.
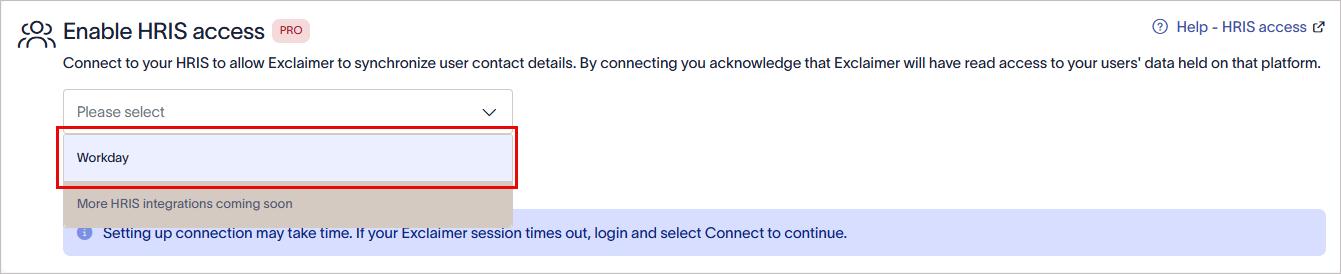
From the drop-down list, select Workday.
-
Select Connect.
The Workday Permissions window is displayed. Grant read-only access and choose which data models are shared.WARNING! If the Workday Permissions window is not displayed, allowlist cdn.bindbee.dev (and preferably .bindbee.dev) to ensure the Bindbee SDK loads correctly in the browser.NOTE: If you require additional custom fields, our team can configure them manually. This option is not currently available as a self-service feature. Get in touch with our Support team for help in setting up any required custom fields.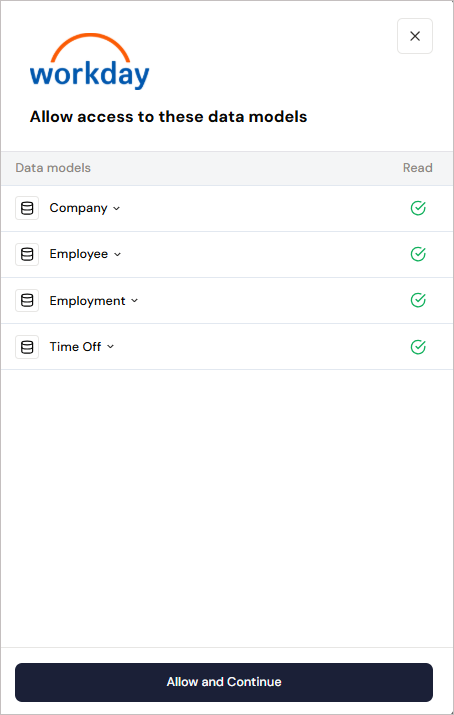
The Workday Permissions window.
- Select Allow and Continue.
- Enter the Integration System User credentials.
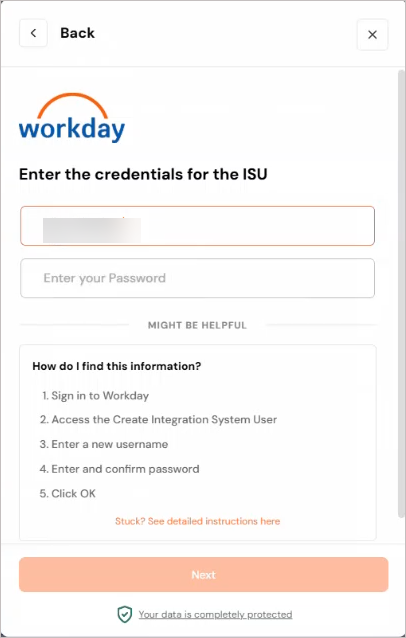
Enter the username and password.
- Select Next.
-
Enter the Workday Web Services Endpoint URL.
To obtain the URL:
- Within Workday, search for Public Web Services.
The Public Web Services window is displayed.
- Locate Benefits Administration (Public). Select Web Service, then select View WSDL.
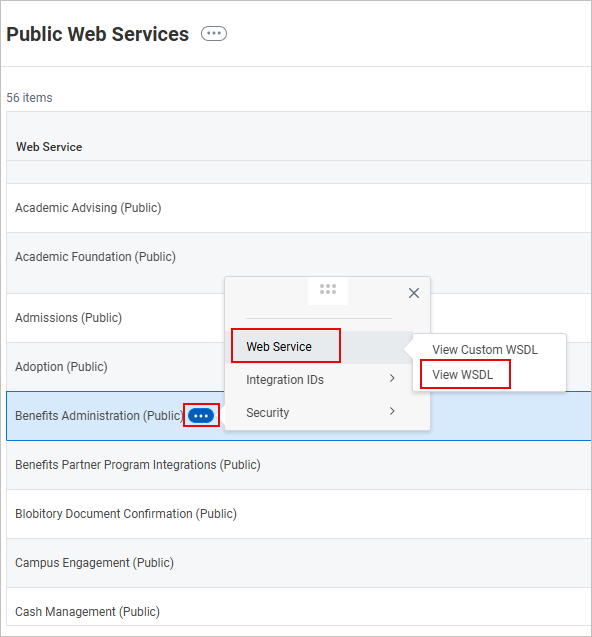
Example image showing how to access the endpoint URL in Workday. In the Public Web Services window, locate Benefits Administration (Public). Select Web Service, then select View WSDL.
An XML file is displayed. -
Scroll to the bottom of the page. Copy the URL up to (but not including) /service/. This is the Web Services Endpoint URL.
WARNING! Do not include the trailing slash after /ccx.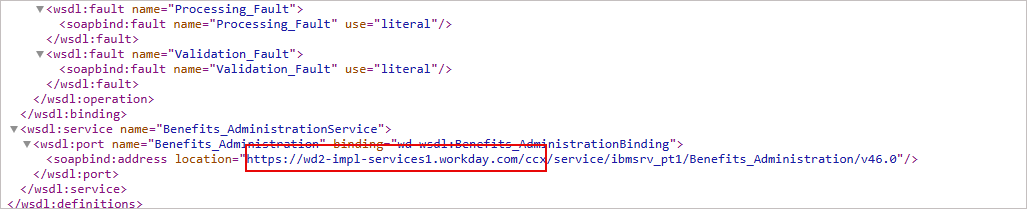
Example image of the XML file in Workday. Copy the URL up to (but not including) /service/.
- Paste the URL in the space provided.
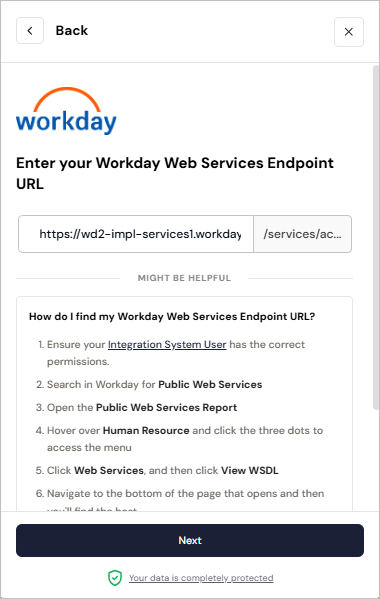
Example image in Exclaimer when trying to connect to the Workday HRIS system.
- Within Workday, search for Public Web Services.
- Select Next.
-
Enter your Workday tenant name.
To find your Workday tenant name:
- In the Workday dashboard, check the URL in your browser. Copy the value that appears after workday.com/
This is the tenant name.
-
Paste this value as the tenant name.
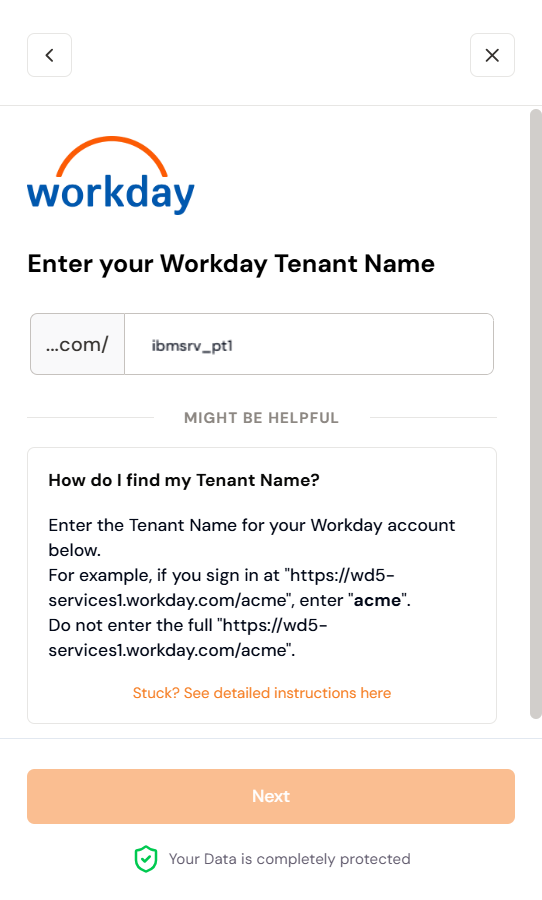
Enter the Workday tenant name.
- In the Workday dashboard, check the URL in your browser. Copy the value that appears after workday.com/
-
Ignore entering the Integration System ID and select Connect to complete the integration between Exclaimer and Workday using Bindbee.

Example image in Exclaimer. Ignore entering the Integration System ID and select Connect.
WARNING! Keep the window open until the connection is complete. If you close it too soon, the connection may not finish setting up, and it may not appear as connected in Exclaimer.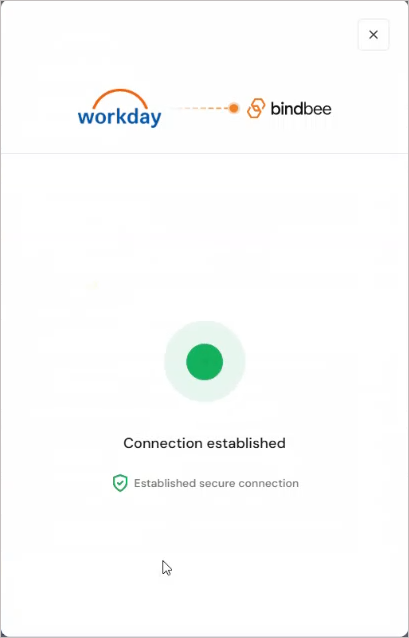
Example screen showing that the connection has been established.
If you try to connect to Workday again, you may see a message saying that the connector already exists. If this happens, raise a support ticket so the team can assist you.Once a connection is established with the Workday HRIS system, the status displays as Connected in Exclaimer.

Once a connection is established with the Workday HRIS system, the Connected text is displayed within Exclaimer.
Manage your Workday connection (Exclaimer)
Follow the options to manage your Workday connection:
To re-connect to the Workday HRIS system:
- Select Re-connect.
A message is displayed that reconnecting will entirely remove your connection to Workday, and any data will no longer be available, and a new connection flow will start automatically.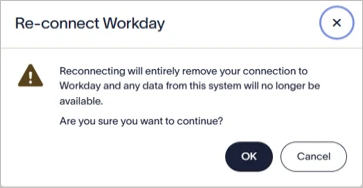
Select OK to reconnect to the Workday HRIS system.
- Select OK to continue.
To disconnect from the Workday HRIS system:
- Select Disconnect.
A message is displayed that disconnecting will entirely remove your connection to Workday, and any data from the system will no longer be available.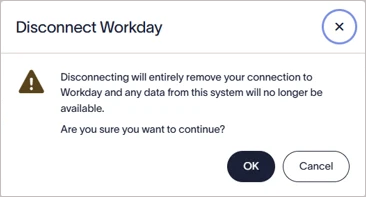
Select OK to disconnect from the Workday HRIS system.
- Select OK to continue.
Workday connectors automatically synchronize data based on a predefined schedule. You can also initiate a manual sync.
To perform a manual sync:
-
Select Sync Now.
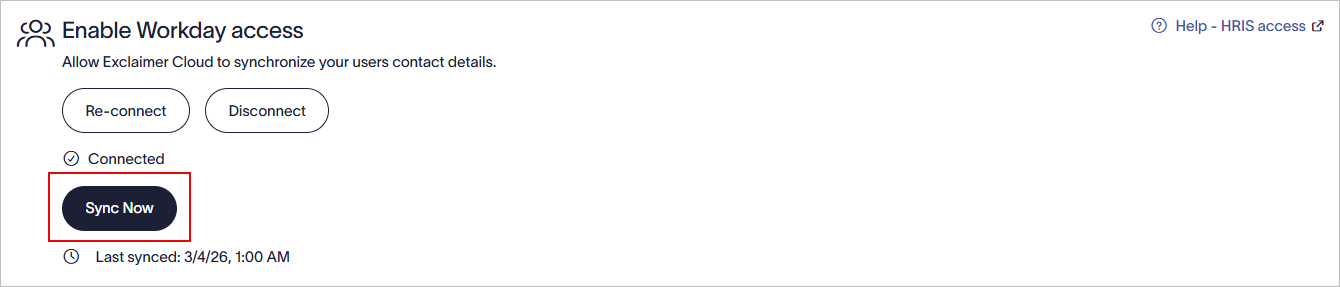
Select Sync Now to start a manual sync.
NOTE: The Sync Now button is enabled only after 6 hours since the last successful sync. If the button is not enabled, the next sync date and time is displayed.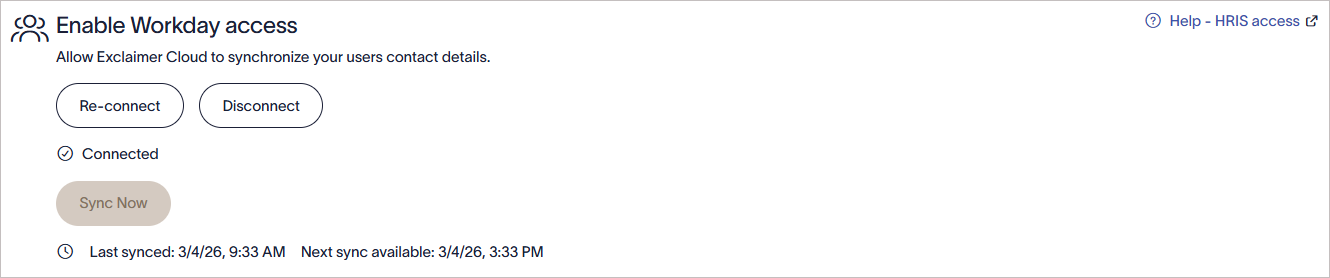
Example image showing that the Sync Now button is not enabled and next sync date and time is displayed.